I see people new to machine learning make the same sort of mistakes. Mistakes that I’ve made myself and then painstakingly tried to fix. So here’s some hints that I’ve had to work out the hard way, along with some code.
As an example, I’ve used my self driving car code, which I’ll put up on the web.
- Plot your input and expected output data! For the training, validation and test data, individually. It’s too easy to accidentally shuffle your data in the wrong place or to have unbalanced data etc.
Example:
def showDrivingAngles(samples, title="samples"):
    plt.hist([sample.driving_angle for sample in samples ], 16)
    plt.title("Driving angle distribution in " + title)
    plt.show()
showDrivingAngles(samples)
- Make sure your data is balanced, by over-sampling, under-sampling or generating fake data.
Example to over-sample: (Suggestions on making this better are welcome!)
def duplicateSamplesToRebalanceByDrivingAngle(samples):
    # Bin the data, returning an array of which bin each sample is in
    num_bins = 16
    indexes = np.digitize([sample.driving_angle for sample in samples], np.arange(-1, 1, 2/num_bins))
    # Find how many samples are in the largest bin
    largest_bin_count = np.max(np.bincount(indexes))
    print(largest_bin_count)
    rebalanced_samples = []
    for j in range(num_bins):
        bin_indexes = np.where(indexes==(j+1))[0]
            for i in range(largest_bin_count):
                rebalanced_samples.append(samples[bin_indexes[i % len(bin_indexes)]])
    random.shuffle(rebalanced_samples)
    return rebalanced_samples
(And of course, plot your data afterwards like above, to check that it worked correctly)
- View random samples of your data after preprocessing. It’s worthwhile to get a bit fancy here. Show the label for the data here. For example, I draw an arrow directly on the image to indicate which direction the label says that it should go in:
image = self.getImage()
 s = image.shape
 line_len = s[0]//2
 angle = self.driving_angle / 360 * np.pi * 100 # Times 100 just to make it more visible
 line_y, line_x = int(line_len * np.cos(angle)), int(line_len * np.sin(angle))
 rr,cc = draw.line(s[0]-1, s[1]//2, s[0]-1-line_y, s[1]//2 + line_x)
 image[rr,cc,:] = 255
 plt.imshow(image)
 plt.title("{} degrees".format(float(self.driving_angle)))
 plt.show()
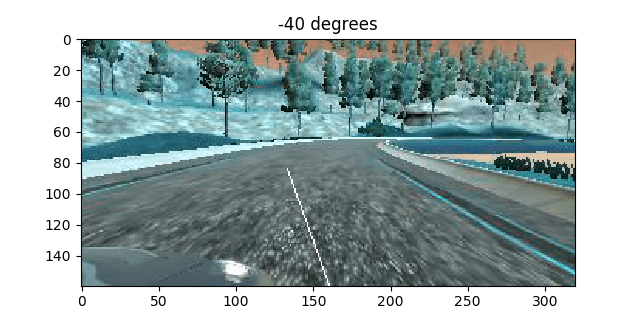
- Check your colorspace! Notice that in the image above, the colors are all wrong. This was totally on purpose, to demonstrate another point – Make sure you understand what colorspace your data is in! cv2.imread() return BGR. While almost everything else is going to use RGB. I highly recommend converting to YUV immediately, and using that everywhere. Make sure you do this in both the code that trains the model, and code that uses the model.
- You can do preprocessing in the model itself. This is extremely useful if you want to use your model in a program and don’t want to copy the preprocessing code.
Example to crop and normalize image:
inputs = keras.layers.Input(shape=(160,320,3))
output = keras.layers.convolutional.Cropping2D(cropping=((55, 25), (0, 0)))(inputs)
output = Lambda(lambda x: x/127.5 - 1., input_shape=imageshape, output_shape=imageshape)(output)
- If you do preprocess in the model, preview the output. You can do this by creating a temporary model and using predict.
Example:
def showLayerOutput(sample):
    model = Model(inputs=inputs, outputs=output)
    sample.showImage()
    croppedimage = model.predict(np.array([sample.getImage()]))[0]
    print(croppedimage)
    plt.imshow(croppedimage)
    plt.show()
showLayerOutput(train_samples[0])
- Use asserts on the shape of your model. For example:
assert output.shape[1:] == (1,31,64)
- Print out some outputs! This is really important to keep an eye on what the predictions are. Are they never negative when you want them to be? Are they never larger than one when you want them to be? (You’re using the wrong activation function on the last layer). Is it always outputting zero or similar (learning rate too high?)
In keras you do this with a callback.
Example:
class DebugCallback(keras.callbacks.Callback):
    def on_epoch_end(self, batch, logs={}):
        samples = train_samples[:5]
        print()
        print(logs)
        print("Should be: ", [sample.driving_angle for sample in samples])
        print("Predicted: ", [x[0] for x in model.predict(np.array([sample.getImage() for sample in samples]))] ) #Print predicted driving angle for first example

debugCallback = DebugCallback()
model.fit_generator(train_generator, epochs=200, steps_per_epoch= len(train_samples)/batch_size, validation_data=validation_generator, validation_steps =len(validation_samples)/batch_size, callbacks=[tbCallBack, checkpointCallback, reduce_lr, debugCallback])
