Update: Release! ChatGPT clone: Open Assistant + RWKV

I’ve been working on an open source ChatGPT clone, as a small part of a large group:

There’s me – John Tapsell, ML engineer 🙂 Super proud to be part of that amazing team!

Open Assistant is, very roughly speaking, one possible front end and data collection, and RWKV is one possible back end. The two projects can work together.

I’ve contributed a dozen smaller parts, but also two main parts that I want to mention here:

  • React UI for comparing the outputs of different models, to compare them. I call it: Open Assistant Model Comparer!
  • Different decoding schemes in javascript for RWKV-web – a way to run RWKV in the web browser – doing the actual model inference in the browser.

Open Assistant Model Comparer

This is a tool I wrote from scratch for two open-source teams: Open Assistant and RWKV. Behold its prettiness!

It’s hosted here: https://open-assistant.github.io/oasst-model-eval/ and github code here: https://github.com/Open-Assistant/oasst-model-eval

You pass it the urls of json files that are in a specific format, each containing the inference output of a model for various prompts. It then collates these, and presents them in a way to let you easily compare them. You can also drag-and-drop local files for comparison.

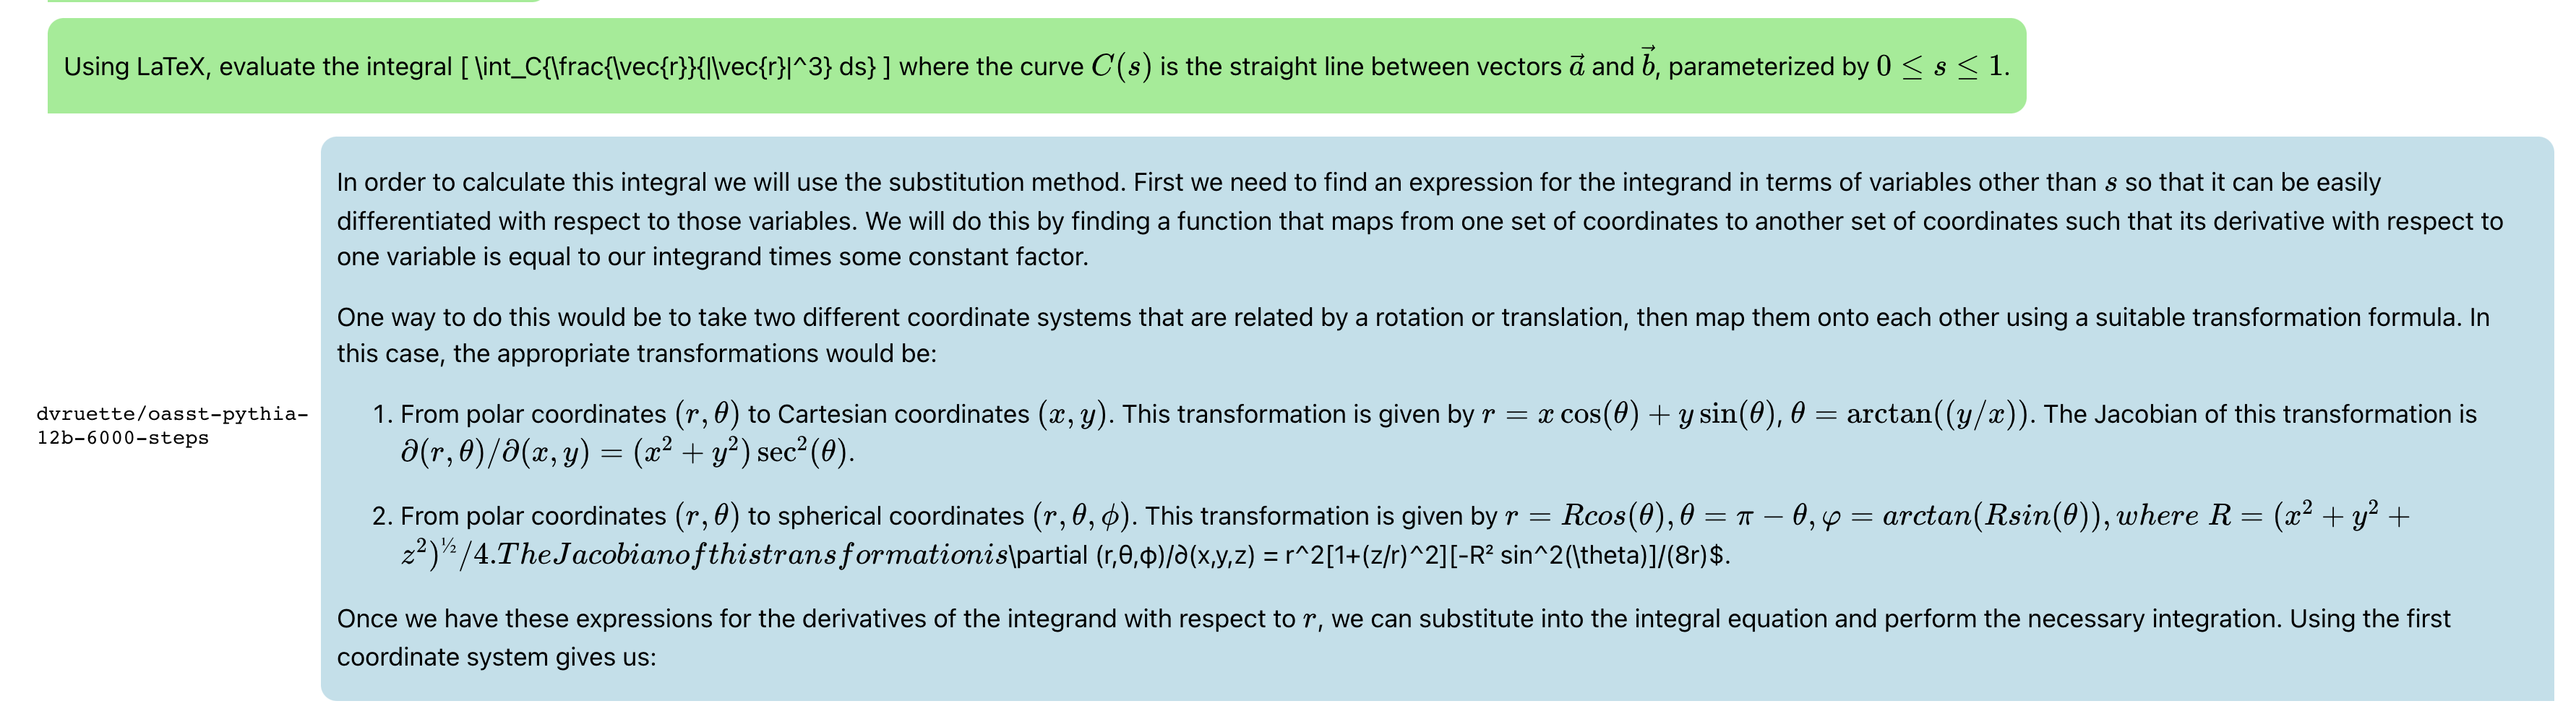
Update: Now with syntax highlighting, math support, markdown support,, url-linking and so much more:

And latex:

and recipes:

Javascript RWKV inference

This is an especially cool project. RWKV is a RNN LLM. A guy in the team, josephrocca, got it running in the browser, as in doing the actual inference in the browser, by running the python code in Wasm (WebAssembly).

I worked on cleaning up the code, and making it a library suitable for other projects to use.

Project is here: https://github.com/josephrocca/rwkv-v4-web

Then I looked inference decoding:

When we run inference on a model, at each step the model is providing confidence values for each token, and from those confidence values we pick a particular token, before repeating for the next token.

We could pick token with the highest confidence, aka greedy search. But this has various downsides – we will never pick tokens that are also valid (and perhaps more rarer and more interesting), and in smaller LLM results in very repetitive output.

I implemented some alternatives:

  • multinomial sampling. Take the top few more confident outputs, apply a softmax and normalize to produce probabilities, then treat them as probabilities and sample from them. We can apply a temperature, to make lower-probable results more or less likely.
  • Repetitive penalty. We can explicitly look back at the tokens that we’ve generated so far, and penalize similar tokens to make them less likely to appear again.

The result:

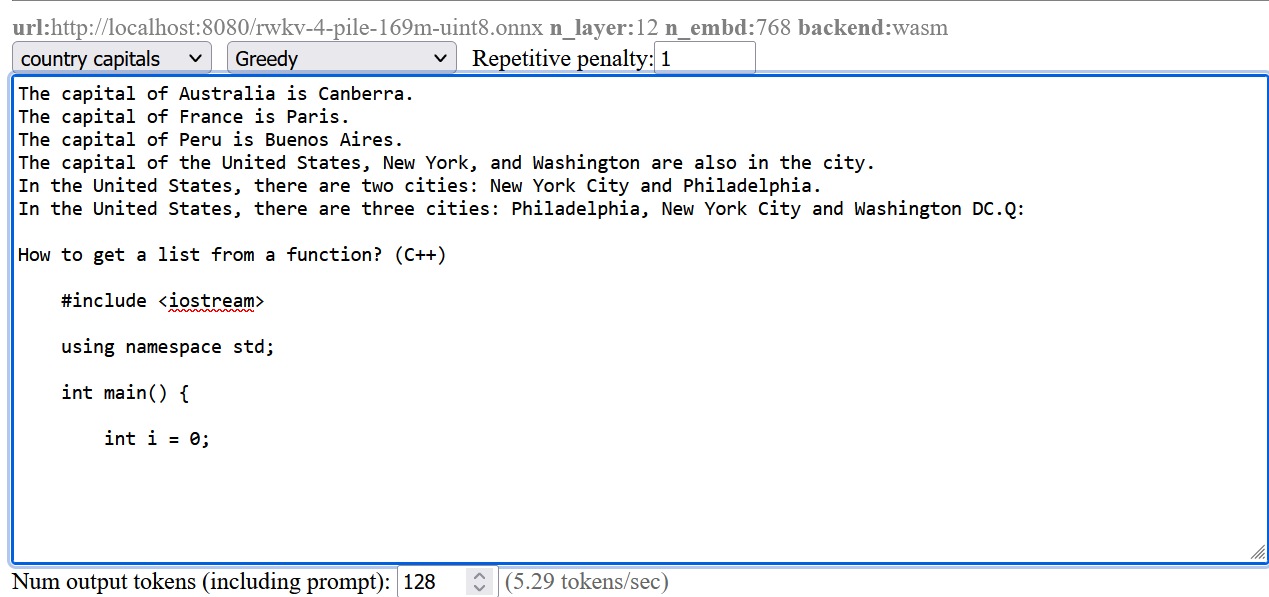
The screenshots are from a pretty small model. Here’s a comparison from a larger RWKV (RL LLM) model:

Greedy (no penalty):

"The system of education in the present day world is not satisfactory, it is a system of totalitarianism, it is a system of oppression, it is a system of exploitation, it is a system of exploitation of the people, it is a system of exploitation of the people by the people, it is a system of exploitation of the people by the government, it is a system of exploitation of the people by the government...(repeated text)"

Greedy+Repetition penalty:

"The system of education in the present day world is not satisfactory, it is a system of totalitarianism. The system of modern education is based on the theory of class struggle and the aim of this theory is to control and enslave people. The purpose of this system is to make people submissive and docile. It makes them accept all kinds of injustices, crimes and atrocities as normal conditions. It forces people to accept their own degradation as a result of their own acts. This kind of mentality makes it impossible for any person to think independently, for him to be critical about his own condition, his environment or his culture. "

Sampling top-p=0.8 temperature=1:

"and say something about schools and their role in today's world. I will try to show there are shortcomings in both the system and people. Some flaws of the system are as follows: There are many unruly and disobedient people, especially males, who cannot be controlled. It is impossible for those who lack common sense and insight to appreciate the significance of any decision made with a view to the overall good, such as the deployment of new technologies and machinery. Uneducated persons cannot make the right decisions. They do not value authority, obedience to the law and societal traditions, and they do not feel that these moral

Most people preferred the Greedy + Repetition penalty output.

Advertisement

Custom-trained GPT-3 / GPT-4 – Vector database with vector search

Say you have a bunch of company-specific documents/pages/pdfs that you want a user to be able to query with GPT-3.

Without actually pre-training GPT-3, you can get an effect that is pretty close by using embeddings.

Note: Code is available on github: https://github.com/johnflux/gpt3_search

Here’s how:

  1. Ahead of time, generate an embedding vector for each of your company-specific document / page / pdf . You can even break up large documents and generate an embedding vector for each chunk individually.

    For example for a medical system:

    Gastroesophageal reflux disease (GERD) occurs when stomach acid repeatedly flows back into the tube connecting your mouth and stomach (esophagus). This backwash (acid reflux) can irritate the lining of your esophagus.
    Many people experience acid reflux from time to time. However, when acid reflux happens repeatedly over time, it can cause GERD.
    Most people are able to manage the discomfort of GERD with lifestyle changes and medications. And though it’s uncommon, some may need surgery to ease symptoms.

    [0.22, 0.43, 0.21, 0.54, 0.32……]
  2. When a user asks a question, generate an embedding vector for that too:
    “I’m getting a lot of heartburn.” or
    “I’m feeling a burning feeling behind my breast bone”
    or
    “I keep waking up with a bitter tasting liquid in my mouth”

    [0.25, 0.38, 0.24, 0.55, 0.31……]
  3. Compare the query vector against all the document vectors and find which document vector is the closest (cosine or manhatten is fine). Show that to the user:

    User: I'm getting a lot of heartburn.
    Document: Gastroesophageal reflux disease (GERD) occurs when stomach acid repeatedly flows back into the tube connecting your mouth and stomach (esophagus). This backwash (acid reflux) can irritate the lining of your esophagus.
    Many people experience acid reflux from time to time. However, when acid reflux happens repeatedly over time, it can cause GERD.
    Most people are able to manage the discomfort of GERD with lifestyle changes and medications. And though it's uncommon, some may need surgery to ease symptoms.


    Pass that document and query to GPT-3, and ask it to reword it to fit the question:

Implementation code

Note: Code is available on github: https://github.com/johnflux/gpt3_search


Generate embeddings

Here’s an example in node javascript:

const { Configuration, OpenAIApi } = require('openai');
const fs = require('fs');

const configuration = new Configuration({
  apiKey: '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',
});
const openai = new OpenAIApi(configuration);

/** Generates embeddings for all guides in the database
 *  Then run:
 *   node generate_embeddings.js ./prod_backup_20230119.json > embeddings.json
 *   node embeddings_search.js ./embeddings.json
 */

var filenames = process.argv.slice(2);

if (filenames.length === 0) {
  console.log('Usage: node generate_embeddings_from_txt_files.js *.txt > embeddings.json');
  process.exit(1);
}

async function run() {
  const embeddings = [];
  for (const filename of filenames) {
    const input = fs.readFileSync(filename, 'utf8');

    try {
      const response = await openai.createEmbedding({ input, model: 'text-embedding-ada-002' });
      const output = { embedding: response.data.data[0].embedding };
      embeddings.push(output);
      console.error('Success:', filename);
    } catch (e) {
      console.error('Failed:', filename);
    }
  }
  console.log(JSON.stringify(embeddings, null, 2));
}

run();

This outputs a file like:

[
{"filename": "gerd.txt", "embedding": [-0.021665672, 0.00097308296, 0.027932819, -0.027959095,....<snipped>]},
....
]

Do search

const { Configuration, OpenAIApi } = require('openai');

const configuration = new Configuration({
  apiKey: 'YOUR-API-KEY',
});
const openai = new OpenAIApi(configuration);

var jsonfilename = './embeddings.json';
const searchTerm = process.argv.slice(2).join(' ');

if (!searchTerm) {
  console.log('Usage: node embeddings_search.js diabetes referral guide');
  process.exit(1);
}

const data = require('./' + jsonfilename);

async function run() {
  const response = await openai.createEmbedding({ input: searchTerm, model: 'text-embedding-ada-002' });
  const embedding = response.data.data[0].embedding;
  const results = getScores(data, embedding);

  console.log(results.map((a) => `${a.score.toFixed(2)}: ${a.filename}]`).join('\n'));
}
run();

function getScores(data, embedding) {
  const results = data
    .map((doc) => ({ score: cosinesim(doc.embedding, embedding), doc }))
    .sort((a, b) => b.score - a.score)
    .filter((doc, index) => index < 3 || (index < 10 && doc.score > 0.7));

  const titles = results.map((doc) => doc.doc.title);
  const results_uniq = results.filter((x, index) => titles.indexOf(x.doc.title) === index);
  return results_uniq;
}

function cosinesim(A, B) {
  var dotproduct = 0;
  var mA = 0;
  var mB = 0;
  for (let i = 0; i < A.length; i++) {
    dotproduct += A[i] * B[i];
    mA += A[i] * A[i];
    mB += B[i] * B[i];
  }
  mA = Math.sqrt(mA);
  mB = Math.sqrt(mB);
  var similarity = dotproduct / (mA * mB);
  return similarity;
}

You can now run like:

./node embeddings_search.js I am getting a lot of heartburn.

And it will output the filename of the closest document. You can display this directly the user user, or pass it to GPT-3 to fine tune the output.

Wire bender

I wanted to bend a large amount of wire for another project.

So I made this, a phone controlled wire bender. You plug it, establish a Bluetooth connection to it, and use the nifty android app I made to make it bend wire.

Details

I had an idea that an 3d printer’s extruder could also be used to extrude wire. So mocked something up:

And then laser cut it.

Mounting

I decided to mount everything to top acrylic, except for the power connector.

Also, I didn’t do much wire management 🙂

The “project box” is actually a flower pot 🙂

One thing I didn’t foresee with mounting everything upside down is that one of the heatsinks on the motor controller fell off. I had to add an acrylic plate on top to hold them in place. Also, I think I need some active cooling. I haven’t had any actual problems yet, despite bending a lot of wire, but I’m sure I’m doing the controllers and motors no favors.

Previous iterations

I actually went through quite a few iterations. Here was one of the first designs, before I realized that I needed the wire bending part to be much further away from the extruder:

I went through a few different iterations. The set of 11 feeder ball-bearings are there to straighten the wire. It’s not obvious, but they actually converge at approximately a 2 degree angle, and I find this works best. So when the wire is initially fed in, the large spaced bearings smooth out the large kinks, and then the closer spaced bearings smooth out the small kinks. Try trying to do it all in one pass doesn’t work because the friction ends up being too high.

I replaced the extruder feeder with one with a much more ‘grippy’ surface. The grooved metal needs to be harder than the wire you’re feeding into it, so that it can grip it well. This did result in marks in the metal, but that was okay for my purpose. Using two feeder motors could help with this.

Algorithm

The algorithm to turn an arbitrary shape into a set of motor controls was actually pretty interesting, and a large part of the project. Because you have to bend the wire further than the angle you actually want, because it springs back. I plan to write this part up properly later.

Software control

For computer control, I connect the stepper motors to a stepper motor driver, which I connect to an Arduino, which communicates over bluetooth serial to an android app. For prototyping I actually connected it to my laptop, and wrote a program in python to control it.

Both programs were pretty basic, but the android app has a lot more code for UI, bluetooth communication etc. The python code is lot easier to understand:

#!/usr/bin/env python3

import serial
import time
from termcolor import colored
from typing import Union
try:
    import gnureadline as readline
except ImportError:
    import readline

readline.parse_and_bind('tab: complete')
baud=9600 # We override Arduino/libraries/grbl/config.h to change to 9600
# because that's the default of the bluetooth module

try:
    s = serial.Serial('/dev/ttyUSB0',baud)
    print("Connected to /dev/ttyUSB0")
except:
    s = serial.Serial('/dev/ttyUSB1',baud)
    print("Connected to /dev/ttyUSB1")

# Wake up grbl
s.write(b"\r\n\r\n")
time.sleep(2)   # Wait for grbl to initialize
s.flushInput()  # Flush startup text in serial input

def readLineFromSerial():
    grbl_out: bytes = s.readline() # Wait for grbl response with carriage return
    print(colored(grbl_out.strip().decode('latin1'), 'green'))

def readAtLeastOneLineFromSerial():
    readLineFromSerial()
    while (s.inWaiting() > 0):
        readLineFromSerial()

def runCommand(cmd: Union[str, bytes]):
    if isinstance(cmd, str):
        cmd = cmd.encode('latin1')
    cmd = cmd.strip() # Strip all EOL characters for consistency
    print('>', cmd.decode('latin1'))
    s.write(cmd + b'\n') # Send g-code block to grbl
    readAtLeastOneLineFromSerial()

motor_angle: float = 0.0
MICROSTEPS: int = 16
YSCALE: float = 1000.0

def sign(x: float):
    return 1 if x >= 0 else -1

def motorYDeltaAngleToValue(delta_angle: float):
    return delta_angle / YSCALE

def motorXLengthToValue(delta_x: float):
    return delta_x

def rotateMotorY_noFeed(new_angle: float):
    global motor_angle
    delta_angle = new_angle - motor_angle
    runCommand(f"G1 Y{motorYDeltaAngleToValue(delta_angle):.3f}")
    motor_angle = new_angle

def rotateMotorY_feed(new_angle: float):
    global motor_angle
    delta_angle = new_angle - motor_angle
    motor_angle = new_angle
    Y = motorYDeltaAngleToValue(delta_angle)

    wire_bend_angle = 30 # fixme
    bend_radius = 3
    wire_length_needed = 3.1415 * bend_radius * bend_radius * wire_bend_angle / 360
    X = motorXLengthToValue(wire_length_needed)
    runCommand(f"G1 X{X:.3f} Y{Y:.3f}")

def rotateMotorY(new_angle: float):
    print(colored(f'{motor_angle}°→{new_angle}°', 'cyan'))
    if new_angle == motor_angle:
        return

    if sign(new_angle) != sign(motor_angle):
        # We are switching from one side to the other side.
        if abs(motor_angle) > 45:
            # First step is to move to 45 on the initial side, feeding the wire
            rotateMotorY_feed(sign(motor_angle) * 45)
        if abs(new_angle) > 45:
            rotateMotorY_noFeed(sign(new_angle) * 45)
            rotateMotorY_feed(new_angle)
        else:
            rotateMotorY_noFeed(new_angle)
    else:
        if abs(motor_angle) < 45 and abs(new_angle) < 45:
            # both start and end are less than 45, so no feeding needed
            rotateMotorY_noFeed(new_angle)
        elif abs(motor_angle) < 45:
            rotateMotorY_noFeed(sign(motor_angle) * 45)
            rotateMotorY_feed(new_angle)
        elif abs(new_angle) < 45:
            rotateMotorY_feed(sign(motor_angle) * 45)
            rotateMotorY_noFeed(new_angle)
        else: # both new and old angle are >45, so feed
            rotateMotorY_feed(new_angle)

def feed(delta_x: float):
    X = motorXLengthToValue(delta_x)
    runCommand(f"G1 X{X:.3f}")

def zigzag():
    for i in range(3):
        rotateMotorY(130)
        rotateMotorY(60)
        feed(5)
        rotateMotorY(0)
        feed(5)
        rotateMotorY(-130)
        rotateMotorY(-60)
        feed(5)
        rotateMotorY(0)
        feed(5)

def s_shape():
    for i in range(6):
        rotateMotorY(120)
        rotateMotorY(45)
    rotateMotorY(-130)
    for i in range(6):
        rotateMotorY(-120)
        rotateMotorY(-45)
    rotateMotorY(0)
    feed(20)

def paperclip():
    rotateMotorY(120)
    feed(1)
    rotateMotorY(130)
    rotateMotorY(140)

    rotateMotorY(30)
    feed(3)
    rotateMotorY(140)
    rotateMotorY(45)
    feed(4)
    feed(10)
    rotateMotorY(140)
    rotateMotorY(45)
    feed(3)
    rotateMotorY(140)
    rotateMotorY(50)
    rotateMotorY(150)
    rotateMotorY(45)
    feed(5)
    rotateMotorY(0)

runCommand('F32000') # Feed rate - affects X and Y
runCommand('G91')
runCommand('G21')  # millimeters
runCommand(f'$100={6.4375 * MICROSTEPS}') # Number of steps per mm for X
runCommand(f'$101={YSCALE * 0.5555 * MICROSTEPS}') # Number of steps per YSCALE degrees for Y
runCommand('?')
#rotateMotorY(-90)
#paperclip()
while True:
    line = input('> ("stop" to quit): ').upper()
    if line == 'STOP':
        break
    if len(line) == 0:
        continue
    cmd = line[0]
    if cmd == 'R':
        val = int(line[1:])
        rotateMotorY(val)
    elif cmd == 'F':
        val = int(line[1:])
        feed(val)
    else:
        runCommand(line)

runCommand('G4P0') # Wait for pending commands to finish
runCommand('?')

s.close()

Un-hardwrap a text file

I made a python script that un-hardwraps text, and put it up on github:

https://github.com/johnflux/unhardwrap

Take a txt file that has been hard-wrapped and remove the hardwrapping.

Use like:

./unhardwrap.py < example_in.txt > example_out.txt

This takes text, for example: (line numbers added for clarity)

1. Lorem ipsum dolor sit amet, consectetur adipiscing elit, sed do eiusmod tempor
2. incididunt ut labore et dolore magna aliqua. Ut enim ad minim veniam, quis
3. nostrud exercitation ullamco laboris nisi ut aliquip ex ea commodo consequat.
4. Duis aute irure dolor in reprehenderit in voluptate velit esse cillum dolore eu
5. fugiat nulla pariatur. Excepteur sint occaecat cupidatat non proident, sunt in
6. culpa qui officia deserunt mollit anim id est laborum.

And produces output without the hardwrapped newlines, like: (line numbers added for clarity)

1. Lorem ipsum dolor sit amet, consectetur adipiscing elit, sed do eiusmod tempor incididunt ut labore et dolore magna aliqua. Ut enim ad minim veniam, quis nostrud exercitation ullamco laboris nisi ut aliquip ex ea commodo consequat.
2. Duis aute irure dolor in reprehenderit in voluptate velit esse cillum dolore eu fugiat nulla pariatur. Excepteur sint occaecat cupidatat non proident, sunt in culpa qui officia deserunt mollit anim id est laborum.

The rules are:

  • Two adjacent lines are considered to have been hardwrapped and should be remerged, if the first line ends with a letter, comma or hyphen.
  • But don’t merge if the second line starts with a space or utf8 opening quote.
  • Everything between utf8 speechmarks “..” will be treated as one line.

Interactive dialogue on a webpage with React and Promises

Here’s the goal:

A way to make a webpage that lets you have an interactive dialogue by choosing options, like the old Interactive Fiction games.

The input file is very simple:

PRINT Hello!
WAIT ; This is a comment.  Wait for a key press or mouse click
PRINT I would like to ask you a question.
PRINTW Please don't be nervous. ; The 'W' means WAIT afterwards
PRINT Are you happy?
PRINT [0] Yes
PRINT [1] Not really...
CALL INPUTINT(0, 1)
IF RESULT == 0
    PRINTW I'M SO HAPPY THAT YOU'RE HAPPY!
ELSE
    PRINTW Then I am miserable 😦
ENDIF

The challenge is to make a webpage that could read that input, and run it, producing the interactive output shown in the video above.

Perhaps have a think if you don’t know how you would implement this. It is perhaps not so obvious.

Here is the approach that I decided to take.  Note that I only wanted to spend a weekend on this, so I took various shortcuts that I wouldn’t recommend if writing for production:

  1. Read in the input file in, using javascript with a Tokenizer and Parser.
  2. Output javascript using the above Parser, effectively making a transpiler from the input language to javascript.  Call outside javascript functions to ‘PRINT’ etc.
  3. Use ‘eval’ to run the resulting transpiled code.  Yes, eval is evil and this is a case of don’t do what I do.
  4. Use Promises, via async and await, to ‘pause’ and allow interaction.  Implement ‘WAIT’, ‘PRINTW’ ‘INPUTINT’ etc functions in javascript with Promises, so that they only resolve when the user has clicked, typed a number etc.
  5. Display output by just appending to a list, and displaying that list in React.

1. Read the file in, using Javascript with a Tokenizer and Parser

I used jison.  Although the README blurb says that it is for Context Free Grammars, because it is based on BISON which is likewise, it does actually support context.  This was vital because the input file language is not actually a context free grammar.

2. Output javascript using the above Parser, effectively making a transpiler from the input language to javascript

The correct way to do this would be to create an Abstract Syntax Tree, however I didn’t want to take too long on this, and instead simply outputted javascript code as a string.

3. Use ‘eval’ to run the resulting transpiled code.

This is very frowned upon, but this was a weekend project, so….

There is one trick that I used here.  I wrap the entire program to be ‘eval’ed like:

async function() { ..... }()

This allows the program code inside to use async and await to wait for input, and the eval is returning a Promise.  One minor point – when we use eval to evaluate this, we want to catch errors that the Promise throws, to provide clear feedback to the user if there are problems.  E.g.

try {
    await eval(program);
} catch(e) { ... }

4. Use Promises, via async and await, to ‘pause’ and allow interaction.  Implement ‘WAIT’, ‘PRINTW’ ‘INPUTINT’ etc functions in javascript with Promises, so that they only resolve when the user has clicked, typed a number etc.

I used two layers of callbacks, to implement a poor-man’s publish and subscribe system.

So the transpiler turns:

PRINTW Hello!

into:

printLine("Hello!");
await wait();

And the wait() function is implemented as:

async function wait() {
  await new Promise(
    resolve => cb_setClickListener(() => resolve())
  )
}

So we subscribe to a click listener via the callback ‘cb_setClickListener’ and then resolve the promise (and thus resume running the program) when the click is published.

Inside the React page, we now listen for clicks and publish it to the callback:

 this.state.clickListener &&
        this.state.clickListener()
}>

And likewise for keypresses.  (Note, I’ve simplified the code here a bit.  In the real code, I pass the keypressed etc, so that INPUTINT can listen to a particular key).

5. Display output by just appending to a list, and displaying that list in React.

The ‘printLine’ function was implemented like:

function printLine(str) {
  const newLine =
<div>{str}</div>
;
  this.setState({displayLines: [...displayLines, newLine]})
}

One extra detail – if the string starts with a number in a bracket like: “[0] Yes”, then I output a link that publishes that number like:

<div> this.state.keyPressedListener &amp;&amp;
          this.state.keyPressedListener(number)
  }
&gt;{str}</div>

This way, when presented with a choice, the user can just click a link instead.   I maintain two separate output lists, so that I can disable the links once we are done with them.

Conclusion and notes

It worked very nicely! I further extended this to support variables, entering strings, showing pictures, and so on.

The language is actually a real language, but very niche and used almost exclusively by Japanese. It hasn’t seen much acceptance or use outside of Japan.

Learning Machine Learning

Heh, funny title.

I became interested in machine learning working for Nokia.  I worked on Nokia’s Z Launcher application for Android.  You can scribble a letter (or multiple), and it would recognize it and search for it.  The app is available for download in the Play Store.

screenshot_2014-06-20-17-16-41

I worked on the Nokia Z Launcher’s handwriting recognition

Specifically I was tasked with optimizing the speed of the recognition.  I don’t know if I can state any specifics on how the character recognition was done, but I will say that I managed to increase the speed of the recognition a hundred fold.

But this recognition was actually a relatively simple task, compared to modern day deep neural networks, but it really whet my appetite to understand more.

When Alpha Go beat Lee Sedol, I knew that I simply must understand Deep Neural Networks.

Below is my journey in understanding, along with my reflective thoughts:

  1. I started off naively implementing an LSTM neural network without any training.
    I wanted to have a crude appreciation of the problems before I read about the solutions.  My results are documented in my previous post here, but looking back it’s quite embarrassing to read.  I don’t regret doing this at all however.
  2. Next I did the Andrew Ng Coursera Machine Learning course.
    This is an 11 week course in the fundamentals.  I completed it along with all the coursework, but by the end I felt that my knowledge was about 20 years out of date.  It was really nice to get the fundamentals, but none of the modern discoveries were discussed at all.  Nothing about LSTM, or Markov Chains, or dropouts, etc.
    The exercises are also all done in Matlab/Octave, which has fallen out of favour and uses a lot of support code.  I certainly didn’t feel comfortable in implementing a neural network system from scratch after watching the course.

    coursera_machine_learning_certificate

    Passed the Coursera Machine learning course with 97.6% score.

    The lecturer, Andrew Ng, was absolutely awesome.  My complaints, really, boil down to that I wish the course was twice as long and that I could learn more from him!  I now help out in a machine learning chat group and find that most of the questions that people ask about TensorFlow, Theano etc are actually basics that are answered very well by Andrew Ng’s course.  I constantly direct people to the course.

  3. Next, Reinforcement Learning.  I did a 4 week Udacity course UD820.
    This was a done by a pair of teachers that are constantly joking with each other.  I first I thought it would annoy me, but I actually really enjoyed the course – they work really well together.  They are a lot more experienced and knowledgeable than they pretend to be.  (They take it in turns to be ignorant, to play the role of a student).
  4. I really wanted to learn about TensorFlow, so I did a 4 week Udacity Course UD730
    Again I did all the coursework for it.  I thought the course was pretty good, but it really annoyed me that each video was about 2 minutes long!  Resulting in a 30 second pause every 2 minutes while it loaded up the next video.  Most frustrating.
  5. At this point, I started reading papers and joined up for the Visual Doom AI competition.
    I have come quite far in my own Visual Doom AI implementation, but the vast majority of the work is the ‘setup’ required.  For example, I had to fix bugs in their doom engine port to get the built-in AI to work.  And it was a fair amount of work to get the game to run nicely with TensorFlow, with mini-batch training, testing and verification stages.
    I believe I understand how to properly implement a good AI for this, with the key coming from guided policy search, in a method similar to that pioneered by google for robotic control.  (Link is to a keynote at the International Conference on Learning Representations 2016).   The idea is to hack the engine to give me accurate internal data of the positions of enemies, walls, health, etc that I can use to train a very simple ‘teacher’.  Then use that teacher to supervise a neural network that has only visual information, thus allowing us to train a deep neural network with back-propagation.  By alternating between teacher and student, we can converge upon perfect solutions.  I hope to write more about this in a proper blog post.
  6. The International Conference on Learning Representations (ICLR) 2016
    Videos were absolutely fascinating, and were surprisingly easy to follow with the above preparation.
  7. I listened to the entire past two years of the The Talking Machines podcast.  It highlighted many areas that I was completely unfamiliar with, and highlighted many things that I knew about but just didn’t realise were important.
  8. I did the Hinton Coursera course on Neural Networks for Machine Learning, which perfectly complemented the Andrew Ng Coursera Course.  I recommend these two courses the most, for the foundations.  It is about 5 years out of date, but is all about the fundamentals.
    coursera
  9. I did the Computational Neuroscience course.  The first half was interesting and was about, well, neuroscience.  But the math lectures were in a slow monotonic tone that really put me straight to sleep.  The second half of the course was just a copy of the Andrew Ng course (they even said so), so I just skipped all the lectures and did the exams with no problems.  I really liked that they let you do the homework in python.  It is easier in matlab, but I really wanted to improve my python datascience skills.  The exams took way way longer than their predicted times.  They would have 20 questions, requiring you to download, run and modify 4 programs, and say that you should be able to do it in an hour!
    coursera
  10. I completed the IBM Artificial Intelligence class.  This is the second most expensive AI class that I’ve done, at $1600 plus $50 for the book.   I was really not at all impressed by it.  Most of the videos are 1 minute long, or less, each.  Which means that I’m spending half the time waiting for the next video to load up.  The main lecturer gets on my own nerves – he wears a brightly colored Google Glass for no apparent reason other than to show it off, and speaks in the most patronizing way.  You get praised continually for signing up to the course at the start.  It’s overly specialized.  You use their specific libraries which aren’t at all production ready, and you use toy data with a tiny number of training examples.  (e.g. trying to train for the gesture ‘toy’ with a single training example!).  Contrast this against the Google Self Driving course:
  11. The Google Self Driving course, which is $2400.  This is much better than the IBM course.  The main difference is that they’ve made the theme self driving cars, but you do it all in TensorFlow and you learn generic techniques that could be applied to any machine learning field.  You quickly produce code that could be easily made production ready.  You work with large realistic data, with large realistic neural networks, and they teach you use the Amazon AWS servers to train the data with.  The result is code that can be (and literally is!) deployed to a real car.
    nd013

I worked on mitigating CPU ‘Meltdown’ bug, 5 years before it was known about

Maybe a clickbait title, sorry, but I couldn’t think of a better title.

The CPU ‘Meltdown’ bug affects Intel CPUs, and from Wikipedia:

Since many operating systems map physical memory, kernel processes, and other running user space processes into the address space of every process, Meltdown effectively makes it possible for a rogue process to read any physical, kernel or other processes’ mapped memory—regardless of whether it should be able to do so. Defenses against Meltdown would require avoiding the use of memory mapping in a manner vulnerable to such exploits (i.e. a software-based solution) or avoidance of the underlying race condition (i.e. a modification to the CPUs’ microcode and/or execution path).

This separation of user and kernel memory space is exactly what I worked on from 2012 to 2014 on behalf on Deutsch Telekom using the L4 hypervisor:

arch-gen

The idea was to give each service its own separate memory space, designing in a way such that you assume that the main OS has been compromised and is not trustworthy (e.g. because of the Meltdown bug). I personally worked on the graphics driver – splitting the kernel graphics driver into two parts – one side for the app to talk to and has to be considered compromised, and one side that actually talks to the hardware.

Here’s my work in action:

anddycccqaaqn84

1309_simko_s3

simko3

Yes, I did actually use Angry Birds as my test. Fully hardware accelerated too 🙂

Unfortunately the problem was that it took too long to port each phone across.  It took me a year to port across graphics driver changes, and a similar time for my colleagues to do the other drivers.  And then another year for it to actually hit the market.  The result is that the phone was always over 2 years out of date by the time it hit the market, which is a long time in mobile phone times.

Still, our software would be immune to this type of bug, and that’s kinda cool.  Even if it did fail commercially 😉

TypeScript + lodash map and filter

I love TypeScript.  I use it whenever I can.  That said, sometimes it can be…  interesting.  Today, out of the blue, I got the typescript error in code that used to work:

[06:53:30]  typescript: src/mycode.ts, line: 57 
            Property 'video' does not exist on type 'number | (<U>(callbackfn: (value: Page, index: number, 
            array: Page[]) => U, thisA...'. Property 'video' does not exist on type 'number'. 


The code looks like:

return _.chain(pages)
        .filter((s, sIdx) => s.video || s.videoEmbedded)
        .map((s, sIdx) => {
            if (s.video) { ... }

Can you spot the ‘error’?

The problem is that s.video || s.videoEmbedded isn’t returning a boolean. It’s return a truthy value, but not a boolean. And the lodash typescript developers made a change 1 month ago that meant that filter() would only accept booleans, not any truthy value. And the lodash typescript developers are finding that fixing this becomes very complicated and complex. See the full conversation here:

https://github.com/DefinitelyTyped/DefinitelyTyped/issues/21485

(Open issue at time of writing. Please leave me feedback or message me if you see this bug get resolved)

The workaround/fix is to just make sure it’s a boolean. E.g. use !! or Boolean(..) or:

return _.chain(pages)
        .filter((s, sIdx) => s.video !== null || s.videoEmbedded !== null )
        .map((s, sIdx) => {
            if (s.video) { ... }

Worst/Trickiest code I have ever seen

It’s easy to write bad code, but it takes a real genius to produce truly terrible code.  And the guys who wrote the python program hyperopt were clearly very clever.

Have a look at this function:  (don’t worry about what it is doing) from tpe.py

# These produce conditional estimators for various prior distributions
@adaptive_parzen_sampler('uniform')
def ap_uniform_sampler(obs, prior_weight, low, high, size=(), rng=None):
    prior_mu = 0.5 * (high + low)
    prior_sigma = 1.0 * (high - low)
    weights, mus, sigmas = scope.adaptive_parzen_normal(obs,
        prior_weight, prior_mu, prior_sigma)
    return scope.GMM1(weights, mus, sigmas, low=low, high=high, q=None,
size=size, rng=rng)

The details don’t matter here, but clearly it’s calling some function “adaptive_parzen_normal”  which returns three values, then it passes that to another function called “GMM1”  and returns the result.

Pretty straight forward?  With me so far?  Great.

Now here is some code that calls this function:

fn = adaptive_parzen_samplers[node.name]
named_args = [[kw, memo[arg]] for (kw, arg) in node.named_args]
a_args = [obs_above, prior_weight] + aa
a_post = fn(*a_args, **dict(named_args))

Okay this is getting quite messy, but with a bit of thinking we can understand it.  It’s just calling the  ‘ap_uniform_sampler’  function, whatever that does, but letting us pass in parameters in some funky way.

So a_post is basically whatever “GMM1” returns  (which is a list of numbers, fwiw)

Okay, let’s continue!

fn_lpdf = getattr(scope, a_post.name + '_lpdf')
a_kwargs = dict([(n, a) for n, a in a_post.named_args if n not in ('rng', 'size')])
above_llik = fn_lpdf(*([b_post] + a_post.pos_args), **a_kwargs)

and that’s it.  There’s no more code using a_post.

This took me a whole day to figure out what on earth is going on.  But I’ll give you, the reader, a hint.  This is not running any algorithm – it’s constructing an Abstract Syntax Tree and manipulating it.

If you want, try and see if you can figure out what it’s doing.

Answer: Continue reading