Second order back propagation

This is a random idea that I’ve been thinking about. A reader messaged me to say that this look similar to online l-bgfs. To my inexperienced eyes, I can’t see this myself, but I’m still somewhat a beginner.

photo

Yes, I chose a cat example simply so that I had an excuse to add cats to my blog.

Say we are training a neural network to take images of animals and classify the image as being an image of a cat or not a cat.

You would train the network to output, say, y_{cat} = 1 if the image is that of a cat.

To do so, we can gather some training data (images labelled by humans), and for each image we see what our network predicts (e.g. “I’m 40% sure it’s a cat”).  We compare that against what a human says (“I’m 100% sure it’s a cat”)  find the squared error (“We’re off by 0.6, so our squared error is 0.6^2”) and adjust each parameter, w_i, in the network so that it slightly decreases the error (\Delta w_i  = -\alpha \partial E/\partial w_i).  And then repeat.

It’s this adjustment of each parameter that I want to rethink.  The above procedure is Stochastic Gradient Descent (SGD) – we adjust w_i to reduce the error for our test set (I’m glossing over overfitting, minibatches, etc).

Key Idea

This means that we are also trying to look for a local minimum. i.e. that once trained, we want the property that if we varied any of the parameters w_i by a small amount then it should increase the expected squared error E

My idea is to encode this into the SGD update. To find a local minima for a particular test image we want:

\dfrac{\partial y_{cat}}{\partial w_i} = 0

\dfrac{\partial^2y_{cat}}{\partial w_i^2}  < 0 (or if it equals 0, we need to consider the third differential etc).

Let’s concentrate on just the first criteria for the moment. Since we’ve already used the letter E to mean the half squared error of y, we’ll use F to be the half squared error of \dfrac{\partial y_{cat}}{\partial w_i}.

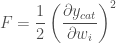
So we want to minimize the half squared error F:

F = \dfrac{1}{2}\left(\dfrac{\partial y_{cat}}{\partial w_i}\right)^2

So to minimize we need the gradient of this error:

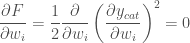
\dfrac{\partial F}{\partial w_i} = \dfrac{1}{2} \dfrac{\partial}{\partial w_i} \left(\dfrac{\partial y_{cat}}{\partial w_i}\right)^2 = 0

Applying the chain rule:

\dfrac{\partial F}{\partial w_i} = \dfrac{\partial y_{cat}}{\partial w_i} \dfrac{\partial^2 y_{cat}}{\partial w_i^2} = 0

SGD update rule

And so we can modify our SGD update rule to:

\Delta w_i = -\alpha \partial E/\partial w_i - \beta \dfrac{\partial y_{cat}}{\partial w_i} \dfrac{\partial^2 y_{cat}}{\partial w_i^2}

Where \alpha and \beta are learning rate hyperparameters.

Conclusion

We finished with a new SGD update rule. I have no idea if this actually will be any better, and the only way to find out is to actually test. This is left as an exercise for the reader 😀

Simple HTML

I frequently want a simple single-file html page that generates some text dynamically based on some inputs at the top of the page.  This can be done in react etc of course, but sometimes my usecase is so simple that it’s an overkill.

For example, to generate some template code based on a few input parameters. Or to make some calculations based on inputs, or to make a customizable story, etc.

With this in mind, I produced the following minimal HTML, using the handlebars processor, that lets me do exactly this:


<!DOCTYPE html>
<html>
<head>
	<meta charset="UTF-8">
    <title>Welcome</title>
    <script type="application/javascript" src="https://cdnjs.cloudflare.com/ajax/libs/handlebars.js/4.0.5/handlebars.min.js"></script>
    <script id="result-template" type="text/x-handlebars-template">
Hello {{name}}!  You are {{age}} years old.  {{#xif "this.age > 18"}} That's really old! {{else}} So young! {{/xif}}


Put the rest of your page here.
    </script>
</head>

<body>
<h2>What is your name?</h2>
Name: <input type="text" id="name" value="Bob"/>

        Age: <input type="number" id="age" value=32 min=0 ><p/><p/>
<div id="resultDiv"></div>
<script>
		var inputs = document.querySelectorAll("input");
		function update() {
			var params = {};
			for (i = 0; i < inputs.length; ++i) {
				params[inputs[i].id] = (inputs[i].type === "number")?Number(inputs[i].value):inputs[i].value;
			}
			document.querySelector("#resultDiv").innerHTML = template(params);
		}
		document.addEventListener("DOMContentLoaded", function() {
			Handlebars.registerHelper("xif", function (expression, options) {
   				 return Handlebars.helpers["x"].apply(this, [expression, options]) ? options.fn(this) : options.inverse(this);
			});
			Handlebars.registerHelper("x", function (expression, options) {
				try { return Function.apply(this, ["window", "return " + expression + " ;"]).call(this, window); } catch (e) { console.warn("{{x " + expression + "}} error: ", e); }
			});

			var source = document.querySelector("#result-template").innerHTML;
			template = Handlebars.compile(source);
			for (i = 0; i < inputs.length; ++i) {
				// Use 'input' to update as the user types, or 'change' on loss of focus
				inputs[i].addEventListener("input", update);
			}
			update();
		});
	</script>
</body>
</html>

Which produces a result like:

html

Single-page HTML that changes the page on user input

Best-fitting to a Cumulative distribution function in python TensorFlow

I wanted to find a best fit curve for some data points when I know that the true curve that I’m predicting is a parameter free Cumulative Distribution Function.  I could just do a linear regression on the points, but the resulting function, y might not have the properties that we desire from a CDF, such as:

  • Monotonically increasing
  • y(x) \xrightarrow{x\to\infty} 1      i.e. That it tends to 1 as x approaches positive infinity
  • y(x) \xrightarrow{x\to-\infty} 0      i.e. That it tends to 0 as x approaches negative infinity

First, I take the second two points.  To deal with this, I use the sigmoid function to create a new parameter, x’:

x'(x) = \textrm{sigmoid}(x)

This has the nice property that x'(x) \xrightarrow{x\to\infty} 1 and x'(x) \xrightarrow{x\to-\infty} 0

So now we can find a best fit polynomial on x'.

So:

y(x') = a + bx' + cx'^2 + dx'^3 + .. + zx'^n

But with the boundary conditions that:

y(0) = 0 and y(1) = 1

Which, solving for the boundary conditions, gives us:

y(0) = 0 = a
b = (1-c-d-e-...-z)

Which simplifies our function to:

y(x') = (1-c-d-e-..-z)x' + cx'^2 + dx'^3 + ex'^4 .. + zx'^n

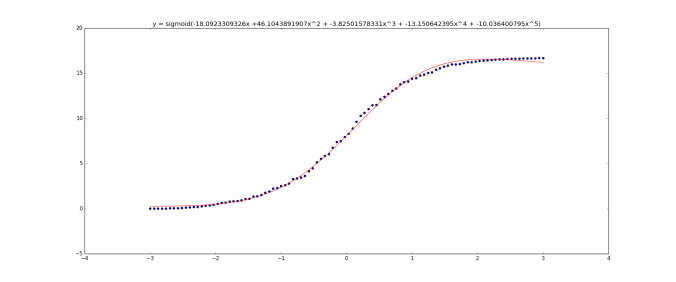
Implementing this in tensorflow using stochastic gradient descent (code is below) we get:

figure_1-2

20 data samples

figure_1-1

100 data samples

(The graph title equation is wrong.  It should be   x' = sigmoid(x) then y(x') = ax' +...  I was too lazy to update the graphs sorry)

Unfortunately this curve doesn’t have one main property that we’d like – it’s not monotonically increasing – it goes above 1. I thought about it for a few hours and couldn’t think of a nice solution.

I’m sure all of this has been solved properly before, but with a quick google I couldn’t find anything.

Edit: I’m updating this 12 days later. I have been thinking in the background about how to enforce that I want my function to be monotonic. (i.e. always increasing/decreasing) I was certain that I was just being stupid and that there was a simple answer. But by complete coincidence, I watched the youtube video Breakthroughs in Machine Learning – Google I/O 2016 in which the last speaker mentioned this restriction.  It turns out that this a very difficult problem – with the first solutions having a time complexity of O(N^4):

I didn’t understand what exactly google’s solution for this is, but they reference their paper on it:  Monotonic Calibrated Interpolated Look-up Tables, JMLR 2016.  It seems that I have some light reading to do!

#!/usr/bin/env python

import tensorflow as tf

import numpy as np
import tensorflow as tf
import matplotlib.pyplot as plt
from scipy.stats import norm

# Create some random data as a binned normal function
plt.ion()
n_observations = 20
fig, ax = plt.subplots(1, 1)
xs = np.linspace(-3, 3, n_observations)

ys = norm.pdf(xs) * (1 + np.random.uniform(-1, 1, n_observations))

ys = np.cumsum(ys)

ax.scatter(xs, ys)
fig.show()
plt.draw()

highest_order_polynomial = 3

# We have our data now, so on with the tensorflow
# Setup the model graph

# Our input is an arbitrary number of data points (That's what the 'None dimension means)
# and each input has just a single value which is a float

X = tf.placeholder(tf.float32, [None])
Y = tf.placeholder(tf.float32, [None])

# Now, we know data fits a CDF function, so we know that
# ys(-inf) = 0   and ys(+inf) = 1

# So let's set:

X2 = tf.sigmoid(X)

# So now X2 is between [0,1]

# Let's now fit a polynomial like:
#
#   Y = a + b*(X2) + c*(X2)^2 + d*(X2)^3 + .. + z(X2)^(highest_order_polynomial)
#
# to those points.  But we know that since it's a CDF:
#   Y(0) = 0 and y(1) = 1
#
# So solving for this:
#   Y(0) = 0 = a
#   b = (1-c-d-e-...-z)
#
# This simplifies our function to:
#
#   y = (1-c-d-e-..-z)x + cx^2 + dx^3 + ex^4 .. + zx^(highest_order_polynomial)
#
# i.e. we have highest_order_polynomial-2  number of weights
W = tf.Variable(tf.zeros([highest_order_polynomial-1]))

# Now set up our equation:
Y_pred = tf.Variable(0.0)
b = (1 - tf.reduce_sum(W))
Y_pred = tf.add(Y_pred, b * tf.sigmoid(X2))

for n in xrange(2, highest_order_polynomial+1):
    Y_pred = tf.add(Y_pred, tf.mul(tf.pow(X2, n), W[n-2]))

# Loss function measure the distance between our observations
# and predictions and average over them.
cost = tf.reduce_sum(tf.pow(Y_pred - Y, 2)) / (n_observations - 1)

# Regularization if we want it.  Only needed if we have a large value for the highest_order_polynomial and are worried about overfitting
# It's also not clear to me if regularization is going to be doing what we want here
#cost = tf.add(cost, regularization_value * (b + tf.reduce_sum(W)))

# Use stochastic gradient descent to optimize W
# using adaptive learning rate
optimizer = tf.train.AdagradOptimizer(100.0).minimize(cost)

n_epochs = 10000
with tf.Session() as sess:
    # Here we tell tensorflow that we want to initialize all
    # the variables in the graph so we can use them
    sess.run(tf.initialize_all_variables())

    # Fit all training data
    prev_training_cost = 0.0
    for epoch_i in range(n_epochs):
        sess.run(optimizer, feed_dict={X: xs, Y: ys})

        training_cost = sess.run(
            cost, feed_dict={X: xs, Y: ys})

        if epoch_i % 100 == 0 or epoch_i == n_epochs-1:
            print(training_cost)

        # Allow the training to quit if we've reached a minimum
        if np.abs(prev_training_cost - training_cost) &amp;lt; 0.0000001:
            break
        prev_training_cost = training_cost
    print &quot;Training cost: &quot;, training_cost, &quot; after epoch:&quot;, epoch_i
    w = W.eval()
    b = 1 - np.sum(w)
    equation = &quot;x' = sigmoid(x), y = &quot;+str(b)+&quot;x' +&quot; + (&quot; + &quot;.join(&quot;{}x'^{}&quot;.format(val, idx) for idx, val in enumerate(w, start=2))) + &quot;)&quot;;
    print &quot;For function:&quot;, equation
    pred_values = Y_pred.eval(feed_dict={X: xs}, session=sess)
    ax.plot(xs, pred_values, 'r')
    plt.title(equation)

fig.show()
plt.draw()
#ax.set_ylim([-3, 3])
plt.waitforbuttonpress()

Unity vs Unreal Engine 4

I implemented two medium-sized projects, one in Unreal Engine 4 and one in Unity 5.

Unfortunately these were both for clients, so I can’t talk about any specifics.  I do, however, want to give some general thoughts on the comparison between them.

Pros and Cons:

  • Unreal Engine 4 seems to have a lot more advanced features.  But I didn’t personally use any of these advanced features.  They didn’t seem easy to use.
  • Unity 5 was much more intuitive for me to use.
  • The Unity 5 asset store was so much nicer to use.  I could buy an asset and import it into my game with a couple of clicks.  With UE4 it seemed so much more difficult.
  • UE4’s VR support simply didn’t work on a Mac.  This sucked because my artists all use Macs.   More annoyingly, it didn’t say why it didn’t work, it just simply disabled the Preview In VR button, giving no reason.   And the reasons were written up in an Internal bug report (UE-11247 apparently) that the UE4 developers constantly refer to, but users aren’t actually allowed to view or see the status of!
  • I much preferred having a managed language (C# or javascript) in Unity than the C++ support in UE4.  Mistakes in C++ code meant crashing the whole app.  It also led to long compile times.   But a mistake in C# meant just having an exception and the app being able to easily recover from it.
  • I tried really hard to get on with UE4’s Blueprint, which is basically a visual “programming” language.  But implementing in a fairly simply mathematical formula would result in 20+ nodes.  Implementing a simple polynomial like  $latex  y = 3x^2 + 2x + 5 $  was incredibly painful in dragging out nodes for each operation.
untitled-46b8493

Blueprint quickly becomes a mess. This is a random example from the web.

  • UE4’s blueprints become particularly annoying when users are asking questions about them.  They’ll paste a screenshot of their blueprint saying that they have a problem.  Someone else then has to try to decipher what is going on from a screenshot, with really no easy way to reproduce.  Users who want to copy a blueprint have to do so manually, node by node..
    I would really love for UE4 to mix in a scripting language, like Javascript.
  • UE4 has lots of cool features, but they are really difficult to just use.  For example, it has a lot of support for adding grass.  You can just paint grass onto your terrain..  except that you can’t because you don’t have any actual grass assets by default.
    The official UE4 tutorials say that to add grass, you should import the whole 6.4 GB Open World Demo Collection to your project!
    But then, even that isn’t enough because it doesn’t have any actual grass materials!  You have to then create your own grass material which is quite a long process.  This was really typical of my experience with UE4.  Why not just have a single ‘grass’ asset that could be instantly used, and then let the user tweak it in more complicated ways if they want to later on?
    Compare this to Unity.  You go to: Assets > Import Package > Terrain Assets  click on the tree or grass that you want, and that’s it.  You can then start painting with that tree or grass immediately.  If you later want to make your own trees, it comes with a tree editor, built in!
  • Unity’s support for Android was much better than UE4’s.
  • UE4 taxed my system a lot more than Unity.  For my beefy desktop, that was no problem.  But the artists had Mac laptops that really struggled.
  • I really like Unity’s GameObject plus Component approach.  Basically, you make a fairly generic GameObject that is in your scene, and then you attach multiple components to it.  For example, if you want a button, your button GameObject would have a mesh, a material, a renderer (to draw the material on the mesh), a hit box (to know when the user presses it) and presumably some custom script component that runs when you hit it.
    And because your custom scripts are written in C# or javascript, you get lovely automatically introspection on the class variables, and any variables are automatically added to the GUI!

Overall, I guess I’ve become a unity fanboy.  Which is a shame, because I started with UE4 and I really wanted to like it.  I have been with UE4 for 2 years, and was a paying sponsor for a year.

I feel that the trouble is their different audiences.  UE4 is obviously targeted towards much larger studios, who want advanced features and don’t care about built in assets etc.  Unity on the other hand is targeted towards Indie developers who want to make quick prototypes and cheap products easily.

This has resulted into a sort of stigma against Unity projects, because there is a glut of rubbish games produced by novices in Unity.  Unity charges about $1,500 per developer to remove the start-up Unity splashscreen, resulting in most indie developers not paying that fee.  Only the good games which sell well can afford to remove that splashscreen.

The result being that if you start up a random indie game on steam greenlight, for example, and see the Unity splashscreen, you know that the game is unlikely to be that good.  Hence a stigma.

Logistic Regression and Regularization

Tons has been written about regularization, but I wanted to see it for myself to try to get an intuitive feel for it.

I loaded a dataset from google into python (a set of images of letters) and implemented a double for-loop to run a logistic regression with different test data sizes, and different regularization parameters.  (The value shown in the graph is actually 1/regularization ).


def doLogisticRegression(trainsize, regularizer):
    fitmodel = linear_model.LogisticRegression(C=regularizer)
    train_datasubset = train_dataset[0:trainsize,:,:].reshape(trainsize, -1)
    x = fitmodel.fit(train_dataset[0:trainsize,:,:].reshape(trainsize, -1),
                 train_labels[0:trainsize])
    return [fitmodel.score(train_datasubset, train_labels[0:trainsize]),
            fitmodel.score(valid_dataset.reshape(valid_dataset.shape[0], -1), valid_labels)
            ]
print(train_dataset.shape[0])
trainsizes = [50,200,300,400,500,600,700,800,900,1000,2000,3000,4000,5000, 10000, 50000, 100000, 200000];
plt.xscale('log')
color = 0
plots = []
for regularizer in [1, 0.1, 0.01, 0.001]:
    results = np.array([doLogisticRegression(x, regularizer) for x in trainsizes])
    dashedplot = plt.plot(trainsizes, results[:,1], '--', label=(&amp;quot;r:&amp;quot; + str(regularizer)))
    plt.plot(trainsizes, results[:,0], c=dashedplot[0].get_color(), label=(&amp;quot;r:&amp;quot; + str(regularizer)))
    plots.append(dashedplot[0])
plt.legend(loc='best', handles=plots)

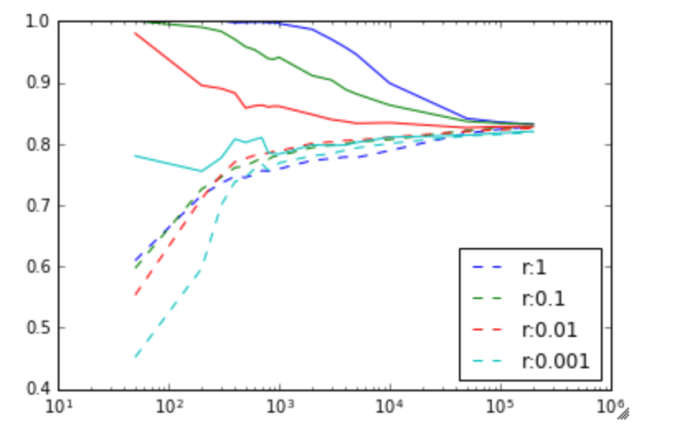
The result is very interesting. The solid line is the training set accuracy, and the dashed line is the validation set accuracy. The vertical axis is the accuracy rate (percentage of images recognized as the correct letter) and the horizontal axis is the number of training examples.

graph of accuracy against training set for logistic regression

Image to letter recognition accuracy against training size, for various values of r = 1/regularization_factor.  Solid line is training set accuracy, dotted line is validation set accuracy.

First, I find it fascinating that purely a logistic regression can produce an accuracy of recognizing letters at 82%. If you added in spell checking, and ran this over an image, you could probably get a pretty decent OCR system, from purely an logistical regression.

Second, it’s interesting to see the effect of the regularization term. At less than about 500 training examples, the regularization term only hurts the algorithm. (A value of 1 means no regularization). At about 500 training examples though, the strong regularization (really helps). As the number of training examples increases, regularization makes less and less of an impact, and everything converges at around 200,000 training samples.

It’s quite clear at this point, at 200,000 training samples, that we are unlikely to get more improvements with more training samples.

A good rule of thumb that I’ve read is that you need approximately 50 training samples per feature. Since we have 28×28 = 784 features, this would be at 40,000 training samples which is actually only a couple of percent from our peak performance at 200,000 training samples (which is 2000000/784=2551 training samples per feature).

At this point, we could state fairly confidently that we need to improve the model if we want to improve performance.

Stochastic Gradient Descent

I reran with the same data but with stochastic gradient descent (batch size 128) and no regularization.  The accuracy (after 9000 runs) on the validation set was about the same as the best case with the logistic regression (81%), but took only a fraction of the time to run.  It took just a few minutes to run, verses a few hours for the logistic regression.

Stochastic Gradient Descent with 1 hidden layer

I added a hidden layer (of size 1024) and reran. The accuracy was only marginally better (84%).  Doubling the number of runs increased this accuracy to 86%.


Exploiting internal neural network symmetries

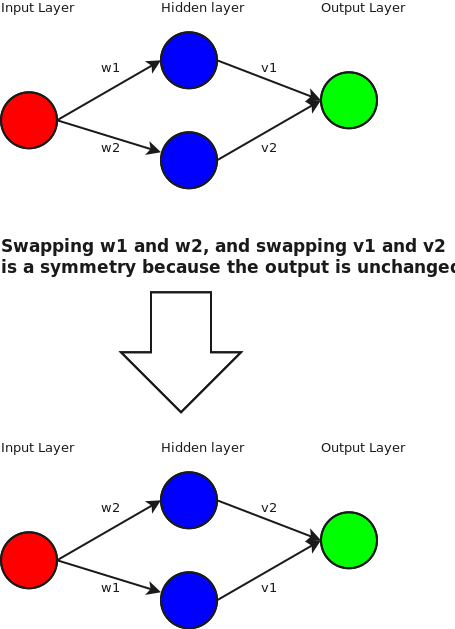
Neural networks have many internal symmetries.  A symmetry is an operation that you can apply to the weights such that for all inputs the outputs are the same.

The trivial symmetry is the identity. If you multiply all the weights in a neural network by 1, then the output remains unchanged.

We can also move nodes around by swapping the weight in any hidden layer.  For example:

Diagram1

But what other symmetries are there?  How is this useful?

Well, by itself, it’s not.  But let’s get hand-wavy.  Let’s say that we are using a ReLU activation function.  What this means is that at our hidden node, if the final value is greater than 0, then the output at that node is the same value.  if it’s negative, then the output is 0.

Let’s hand wave like crazy, and consider only the case where the node is activated (i.e the total value going into node is >=0).  The output is equal to the input, and in this region it is linear.

So, ignoring the non-linear case, we can find an interesting symmetry.  We can project to the basis   [1,1]/\sqrt{2} and [1,-1]/\sqrt{2}.  Or in pictures:

Diagram2

So, ignoring the non-linearity at the hidden layer, we find that we can actually weights in a more interesting fashion.

Now, what can we do with this?

Honestly, I’m not sure.  One idea I had is if you’ve optimized a neural net and reached the peak that your training set can give you, you could apply this swap operation to random nodes and retrain and see if it helps.  The effect is that you’re leaving the weights the same, but changing when the node activates.  Hopefully I’ll have a better idea later.

Meta Neural Network

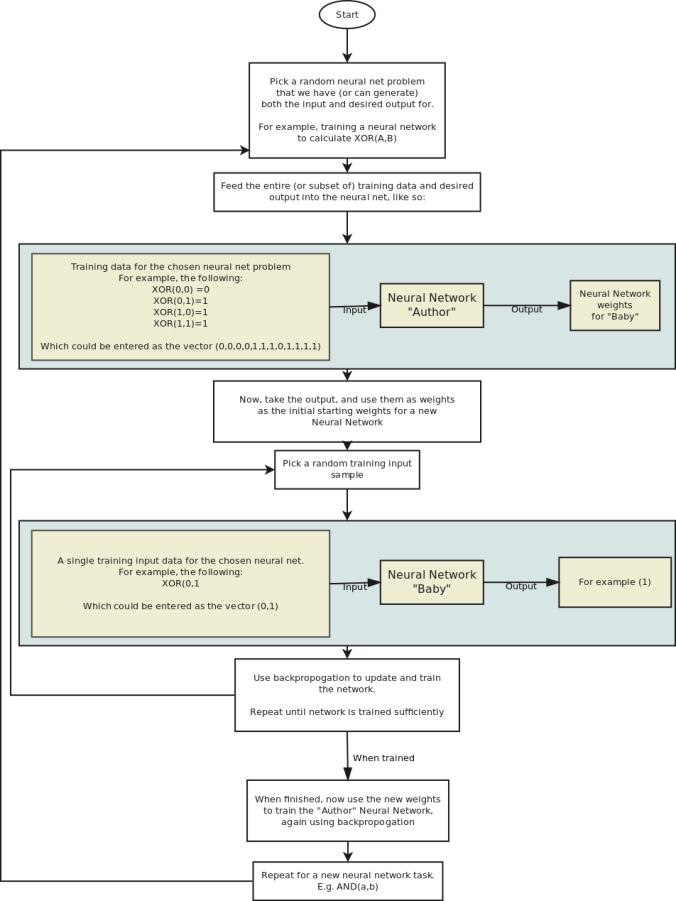
The idea is to create a large neural network which itself generates other neural networks.  The goal is to let the neural network find a way to just create new networks without any training needed.

I have two very different ideas on how to do this.

The first is not so practical to implement for any real world problems, but would be interesting to test on toy problems:

meta neural net idea

Now, this idea has many drawbacks.  One problem is that when training the “Author” network in the first place, you typically have a fixed size input and so the training input will need to have a fixed size.

Since the input needs to be a fixed size, this means that you are limited to fixed size input and output for all the “Baby” Neural Networks that are generated, and that you must always have the same number of training samples.

Likewise, since the output is a fixed size, the weights has to be a fixed size, and so the number of layers, size of the layers, architecture, and so on has to be fixed for all possible Baby networks generated for a given Author.

Four point gradient as a GLSL shader

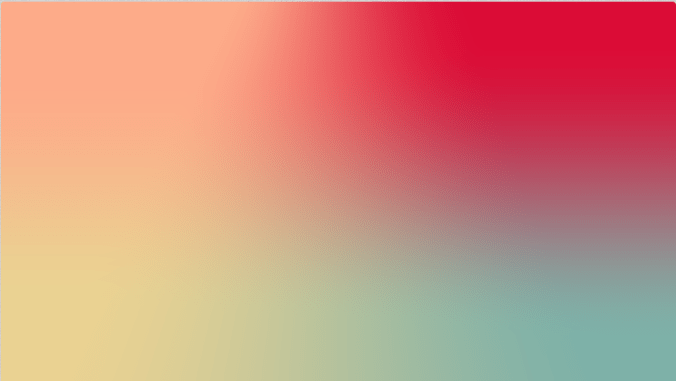
For a client I needed a way to draw a gradient in realtime generated from four points, on a mobile phone.  To produce an image like this, where the four gradient points can be moved in realtime:

gradient_with_smoothstep

I wanted to implement this using a shader, but after googling for a while I couldn’t find an existing implementation.


The problem is that I have the desired colours at four points, and need to calculate the colour at any other arbitrary point.


gradient

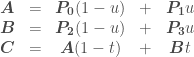
So we have three simultaneous equations (vectors in bold):

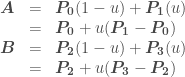
\begin{array} {ccccc} \boldsymbol{A} &=& \boldsymbol{P_0} (1-u) &+& \boldsymbol{P_1} u \\ \boldsymbol{B} &=& \boldsymbol{P_2} (1-v) &+& \boldsymbol{P_3} v \\ \boldsymbol{C} &=& \boldsymbol{A} (1-t) &+& \boldsymbol{B} t \end{array}

The key to solving this is to reduce the number of freedoms by setting u = v.

\begin{array} {ccccc} \boldsymbol{A} &=& \boldsymbol{P_0} (1-u) &+& \boldsymbol{P_1} u \\ \boldsymbol{B} &=& \boldsymbol{P_2} (1-u) &+& \boldsymbol{P_3} u \\ \boldsymbol{C} &=& \boldsymbol{A} (1-t) &+& \boldsymbol{B} t \end{array}

Solving for t gives us:

(\boldsymbol{A-B})t = (\boldsymbol{A-C})

And solving for \boldsymbol{A} and \boldsymbol{B}:

\begin{array} {ccl} \boldsymbol{A} &=& \boldsymbol{P_0} (1-u) + \boldsymbol{P_1}(u)\\ &=& \boldsymbol{P_0} + u(\boldsymbol{P_1} - \boldsymbol{P_0})\\ \boldsymbol{B} &=& \boldsymbol{P_2} (1-u) + \boldsymbol{P_3}(u)\\ &=& \boldsymbol{P_2} + u(\boldsymbol{P_3} - \boldsymbol{P_2}) \end{array}

so:

\boldsymbol{A}-\boldsymbol{B} = \boldsymbol{P_0} - \boldsymbol{P_2} + u(\boldsymbol{P_1} - \boldsymbol{P_0} + \boldsymbol{P_2} - \boldsymbol{P_3}) \Rightarrow \\\\ (\boldsymbol{P_0} - \boldsymbol{P_2} + u(\boldsymbol{P_1} - \boldsymbol{P_0} + \boldsymbol{P_2} - \boldsymbol{P_3}))t = \boldsymbol{P_0} + u(\boldsymbol{P_1} - \boldsymbol{P_0}) - \boldsymbol{C}\\

Defining:

\begin{array} {ccl} \boldsymbol{Q} &=& \boldsymbol{P_0} - \boldsymbol{P_2}\\ \boldsymbol{R} &=& \boldsymbol{P_1} - \boldsymbol{P_0}\\ \boldsymbol{S} &=& \boldsymbol{R} + \boldsymbol{P_2} - \boldsymbol{P_3}\\ \boldsymbol{T} &=& \boldsymbol{P_0} - \boldsymbol{C} \end{array}

Lets us now rewrite (\boldsymbol{A-B})t = (\boldsymbol{A-C}) as:

(\boldsymbol{Q} + u\boldsymbol{S})t = \boldsymbol{T} + u\boldsymbol{R}

Which written out for x and y is:

(Q.x + u S.x)t = T.x + uR.x\\ (Q.y + u S.y)t = T.y + uR.y

Now we have to consider the various different cases. If Q.x == 0\ \&\&\ S.x == 0 then we have:

u = -T.x/R.x\\ t = (T.y + uR.y) / (Q.y + u S.y)

Likewise if Q.y == 0\ \&\&\ S.y == 0 then we have:

u = -T.y/R.y\\ t = (T.x + uR.x) / (Q.x + u S.x)

Otherwise we are safe to divide by (Q.y + u S.y) and so:

\\ (Q.x + u S.x)/(Q.y + u S.y) = (T.x + uR.x)/(T.y + uR.y)\\ \\ (Q.x + u S.x)(T.y + uR.y) = (T.x + uR.x)(Q.y + u S.y)\\ \\ (Q.x + u S.x)T.y +(Q.x + u S.x) uR.y = (T.x + uR.x)Q.y + (T.x + uR.x)u S.y\\ \\ Q.x T.y + u S.x T.y +Q.x uR.y + u S.x uR.y = T.x Q.y + uR.x Q.y + T.x u S.y + uR.x u S.y\\ \\ Q.x T.y - T.x Q.y + u (S.x T.y - T.x S.y + Q.x R.y - R.x Q.y) + u^2 (S.x R.y - R.x S.y) = 0\\ \\ A := S.x R.y - R.x S.y\\ B := S.x T.y - T.x S.y + Q.x R.y - R.x Q.y\\ C := Q.x T.y - T.x Q.y\\ \\ A u^2 + B u + C = 0\\

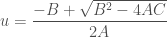
Which can be solved with the quadratic formula when A is not zero: (Note that only the positive solution makes physical sense for us, and we can assume A \neq 0 )
u = \dfrac{-B+\sqrt{B^2 - 4AC}}{2A}

and when A is zero (or, for computational rounding purposes, close to zero):

u = \dfrac{-B}{C}

Math Summary

We can determine u and t with:

\begin{array} {ccl} \boldsymbol{Q} &=& \boldsymbol{P_0} - \boldsymbol{P_2}\\ \boldsymbol{R} &=& \boldsymbol{P_1} - \boldsymbol{P_0}\\ \boldsymbol{S} &=& \boldsymbol{R} + \boldsymbol{P_2} - \boldsymbol{P_3}\\ \boldsymbol{T} &=& \boldsymbol{P_0} - \boldsymbol{C}\\ A &:=& S.x R.y - R.x S.y\\ B &:=& S.x T.y - T.x S.y + Q.x R.y - R.x Q.y\\ C &:=& Q.x T.y - T.x Q.y\\ u &=& \begin{cases} -T.x/R.x, & \mbox{if } \mbox{ Q.x == 0.0\ \&\&\ S.x == 0.0} \\ -T.y/R.y, & \mbox{if } \mbox{ Q.y == 0.0\ \&\&\ S.y == 0.0} \\ \dfrac{-B}{C}, & \mbox{if A == 0} \\ \dfrac{-B+\sqrt{B^2 - 4AC}}{2A}, & \mbox{otherwise} \\ \end{cases} \\\\ t &=& \begin{cases} \dfrac{T.y + u R.y}{Q.y + u S.y}, & \mbox{if } \mbox{ Q.x == 0.0\ \&\&\ S.x == 0.0} \\ \dfrac{T.y + u R.y}{Q.y + u S.y}, & \mbox{otherwise} \\ \end{cases} \end{array}

Implementation as a shader:

This can be implemented as a shader as following: (The following can be run directly on https://www.shadertoy.com for example)

void mainImage( out vec4 fragColor, in vec2 fragCoord )
{

    //Example colors.  In practise these would be passed in
    // as parameters
    vec4 color0 = vec4(0.918, 0.824, 0.573, 1.0); // EAD292
    vec4 color1 = vec4(0.494, 0.694, 0.659, 1.0); // 7EB1A8
    vec4 color2 = vec4(0.992, 0.671, 0.537, 1.0); // FDAB89
    vec4 color3 = vec4(0.859, 0.047, 0.212, 1.0); // DB0C36

    vec2 uv = fragCoord.xy / iResolution.xy;

    //Example coordinates.  In practise these would be passed in
    // as parameters
    vec2 P0 = vec2(0.31,0.3);
    vec2 P1 = vec2(0.7,0.32);
    vec2 P2 = vec2(0.28,0.71);
    vec2 P3 = vec2(0.72,0.75);

    vec2 Q = P0 - P2;
    vec2 R = P1 - P0;
    vec2 S = R + P2 - P3;
    vec2 T = P0 - uv;

    float u;
    float t;

    if(Q.x == 0.0 &amp;amp;&amp;amp; S.x == 0.0) {
        u = -T.x/R.x;
        t = (T.y + u*R.y) / (Q.y + u*S.y);
    } else if(Q.y == 0.0 &amp;amp;&amp;amp; S.y == 0.0) {
        u = -T.y/R.y;
        t = (T.x + u*R.x) / (Q.x + u*S.x);
    } else {
        float A = S.x * R.y - R.x * S.y;
        float B = S.x * T.y - T.x * S.y + Q.x*R.y - R.x*Q.y;
        float C = Q.x * T.y - T.x * Q.y;
        // Solve Au^2 + Bu + C = 0
        if(abs(A) < 0.0001)
            u = -C/B;
        else
	    u = (-B+sqrt(B*B-4.0*A*C))/(2.0*A);
        t = (T.y + u*R.y) / (Q.y + u*S.y);
    }
    u = clamp(u,0.0,1.0);
    t = clamp(t,0.0,1.0);

    // These two lines smooth out t and u to avoid visual 'lines' at the boundaries.  They can be removed to improve performance at the cost of graphics quality.
    t = smoothstep(0.0, 1.0, t);
    u = smoothstep(0.0, 1.0, u);

    vec4 colorA = mix(color0,color1,u);
    vec4 colorB = mix(color2,color3,u);
    fragColor = mix(colorA, colorB, t);
}

And the same code again, but formatted as a more typical shader and with parameters:

          uniform lowp vec4 color0;
          uniform lowp vec4 color1;
          uniform lowp vec4 color2;
          uniform lowp vec4 color3;
          uniform lowp vec2 p0;
          uniform lowp vec2 p1;
          uniform lowp vec2 p2;
          uniform lowp vec2 p3;
          varying lowp vec2 coord;

          void main() {
            lowp vec2 Q = p0 - p2;
            lowp vec2 R = p1 - p0;
            lowp vec2 S = R + p2 - p3;
            lowp vec2 T = p0 - coord;

            lowp float u;
            lowp float t;

            if(Q.x == 0.0 &amp;amp;&amp;amp; S.x == 0.0) {
                u = -T.x/R.x;
                t = (T.y + u*R.y) / (Q.y + u*S.y);
            } else if(Q.y == 0.0 &amp;amp;&amp;amp; S.y == 0.0) {
                u = -T.y/R.y;
                t = (T.x + u*R.x) / (Q.x + u*S.x);
            } else {
                float A = S.x * R.y - R.x * S.y;
                float B = S.x * T.y - T.x * S.y + Q.x*R.y - R.x*Q.y;
                float C = Q.x * T.y - T.x * Q.y;
                // Solve Au^2 + Bu + C = 0
                if(abs(A) < 0.0001)
                    u = -C/B;
                else
                    u = (-B+sqrt(B*B-4.0*A*C))/(2.0*A);
                t = (T.y + u*R.y) / (Q.y + u*S.y);

            }
            u = clamp(u,0.0,1.0);
            t = clamp(t,0.0,1.0);

            // These two lines smooth out t and u to avoid visual 'lines' at the boundaries.  They can be removed to improve performance at the cost of graphics quality.
            t = smoothstep(0.0, 1.0, t);
            u = smoothstep(0.0, 1.0, u);

            lowp vec4 colorA = mix(color0,color1,u);
            lowp vec4 colorB = mix(color2,color3,u);
            gl_FragColor = mix(colorA, colorB, t);
          }

Result

On the left is the result using smoothstep to smooth t and u, and on the right is the result without it.  Although the non-linear smoothstep is computationally-expensive and a hack, I wasn’t happy with the visual lines that resulted in not using it.

Lego

A quick break from any serious posts 🙂

First a LEGO bridge that I put together, held up by the tension in the inverted catenary suspension ‘rope’.  It’s surprisingly sturdy – it can be picked up and moved without danger of breaking – the tension gives it quite a bit of strength.

q4edy48

Lego suspension bridge

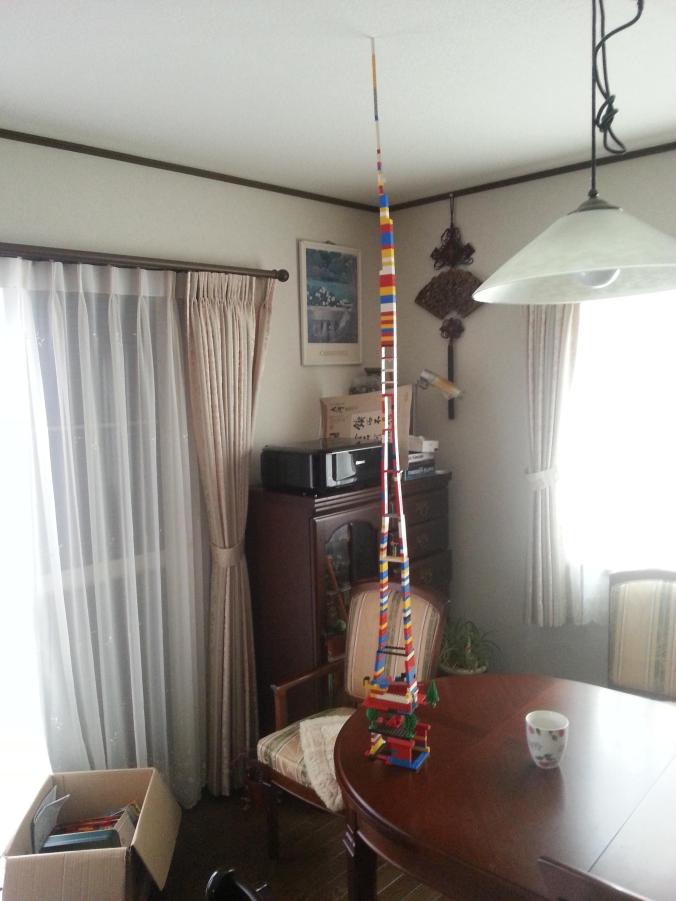
And next a tower.

I starting running out of LEGO and so had to resort to balancing it on LEGO trees.

isosceles_trapezoid

Isosceles Trapezoid

I made this after fiddling with the blocks and realising that I can quite significantly increase the sturdiness of a tower by forcing the LEGO blocks to connect an angle to make a trapezoid shape.  I played about with different shapes and angles to maximize strength.  The result looks very slapdash, but it’s surprisingly strong.

9gmzrua

Tower

Long Short Term Memory

LSTM Neural Networks are interesting.  There’s plenty of literature on the web about them, so I thought I’d cut to the chase and show how to implement a toy game.

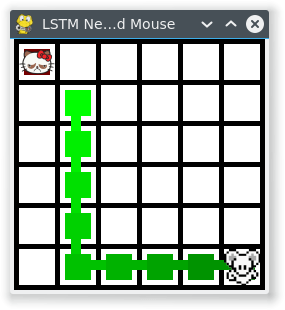
In this game, we want to have a mouse and a cat in a room.  The cat tries to eat the mouse, and the mouse tries to avoid being eaten.
mouse_with_stationary_cat1

Cat & Mouse start randomly.  Mouse is taught to run away from the stationary cat.

We will give the mouse and cat both an LSTM Neural Network brain, and let them fight it out.

This game will be implemented with a straight forward LSTM neural network.  This means that it is supervised which means that our mouse and cat brains can only learn by example.

This is really important – it means that we can’t just have our mouse and cat learn for themselves.  We could do that if we used genetic algorithms to develop the neural networks, but that’s not how we’re doing it here.

With all that said, let’s just dive straight in!

First, lets set up a sigmoid function and its derivative:

sigmoidc

#!/usr/bin/python
import copy, numpy as np
import math
np.random.seed(0)

# compute sigmoid nonlinearity
def sigmoid(x):
    output = 1/(1+np.exp(-x))
    return output

# convert output of sigmoid function to its derivative
def sigmoid_output_to_derivative(output):
    return output*(1-output)
class LSTM_Brain:
    def __init__(self):
        self.alpha = 0.1         # Training rate
        self.input_dim = 4       # Number of parameters for the input.  We input the position of the cat and the mouse.
        self.hidden_dim = 16     # Size of a brain, so to speak.  Feel free to vary
        self.output_dim = 1      # Number of outputs.  We output just the preferred direction, so just one.
        self.brain_wipe()

    def setupTraining(self):
        self.input_values = list()
        self.layer_2_deltas = list()
        self.layer_1_values = list()
        self.layer_1_values.append(np.zeros(self.hidden_dim))
        self.total_abs_error = 0  # Store the error and smoothed error just for debugging information

    def feedInputForGetOutput(self, inputData):
        # inputData has only been tested for values between 0 and 1.  Not sure how it works otherwise
        assert len(inputData) == self.input_dim
        X = np.array([inputData])
        self.input_values.append(X)
        # Feed the input to our 'brain', and return the output (e.g. which direction it thinks we should move in)
        # hidden layer (input ~+ prev_hidden)
        layer_1 = sigmoid(np.dot(X,self.synapse_0) + np.dot(self.layer_1_values[-1],self.synapse_h))
        # output layer (new action)
        self.layer_2 = sigmoid(np.dot(layer_1,self.synapse_1))
        # store hidden layer so we can use it in the next timestep
        self.layer_1_values.append(copy.deepcopy(layer_1))
        return self.layer_2[0]

    def teachError(self, error):
        self.total_abs_error += sum(np.abs(error))  # We store this just for debugging
        self.layer_2_error = np.array([error]).T
        self.layer_2_deltas.append((self.layer_2_error)*sigmoid_output_to_derivative(self.layer_2))

    def brain_wipe(self):
        # initialize neural network weights.  Forget everything we've learned
        self.synapse_0 = 2*np.random.random((self.input_dim,self.hidden_dim)) - 1
        self.synapse_1 = 2*np.random.random((self.hidden_dim,self.output_dim)) - 1
        self.synapse_h = 2*np.random.random((self.hidden_dim,self.hidden_dim)) - 1
        self.total_smoothed_abs_error = None

    def learnFromGame(self):
        future_layer_1_delta = np.zeros(self.hidden_dim)
        synapse_0_update = np.zeros_like(self.synapse_0)
        synapse_1_update = np.zeros_like(self.synapse_1)
        synapse_h_update = np.zeros_like(self.synapse_h)

        # Now, learn from the game
        for time_tick in range(len(self.input_values)):
            X = self.input_values[-time_tick-1]

            layer_1 = self.layer_1_values[-time_tick-1]
            prev_layer_1 = self.layer_1_values[-time_tick-2]

            # error at output layer
            layer_2_delta = self.layer_2_deltas[-time_tick-1]
            # error at hidden layer
            layer_1_delta = (future_layer_1_delta.dot(self.synapse_h.T) + layer_2_delta.dot(self.synapse_1.T)) * sigmoid_output_to_derivative(layer_1)

            # let's update all our weights so we can try again
            synapse_1_update += np.atleast_2d(layer_1).T.dot(layer_2_delta)
            synapse_h_update += np.atleast_2d(prev_layer_1).T.dot(layer_1_delta)
            synapse_0_update += X.T.dot(layer_1_delta)

            future_layer_1_delta = layer_1_delta

        self.synapse_0 += synapse_0_update * self.alpha
        self.synapse_1 += synapse_1_update * self.alpha
        self.synapse_h += synapse_h_update * self.alpha

        if self.total_smoothed_abs_error is None:
            self.total_smoothed_abs_error = self.total_abs_error
        else:
            self.total_smoothed_abs_error = self.total_smoothed_abs_error * 0.999 + 0.001* self.total_abs_error  # Smooth it - for debugging only

At this point, we’ve got a basic LSTM.

Let’s now give it a world and put this brain in a mouse, and the mouse in a world.

class World:
    # For directions, 0,0 is in the bottom left.  Up is positive y.  Direction is between 0 and 1
    Up = 0.125
    Right = 0.375
    Down = 0.625
    Left = 0.875

    def __init__(self):
        self.map_width = 6
        self.map_height = 6

    def resetWorld(self, cat_x, cat_y, mouse_x, mouse_y):
        self.cat_x = cat_x
        self.cat_y = cat_y
        self.mouse_x = mouse_x
        self.mouse_y = mouse_y

    def distance_from_cat_x(self):
        return self.mouse_x - self.cat_x
    def distance_from_cat_y(self):
        return self.mouse_y - self.cat_y

    def moveMouse(self, time_tick, mouse_movement):
        if mouse_movement &lt; (self.Up + 0.125):   # 0 to 0.25 is up.  midpoint is 0.125
            self.mouse_y += 1
        elif mouse_movement &lt; (self.Right + 0.125):  # 0.25 to 0.5 is right.  midpoint is 0.375
            self.mouse_x += 1
        elif mouse_movement &lt; (self.Down + 0.125): # 0.5 to 0.75 is down.  midpoint is 0.625
            self.mouse_y -= 1
        else:
            self.mouse_x -= 1   # 0.75 to 1 is left.  midpoint is 0.875
        self.mouse_x = np.clip(self.mouse_x, 0, self.map_width-1)
        self.mouse_y = np.clip(self.mouse_y, 0, self.map_height-1)

class GameWithStupidComputerTeacher:
    def __init__(self):
        self.debug = False     # Whether to print out debug information
        self.game_length = 10  # Number of moves a game should last for.  We make this fixed, but we could make it variable
        self.world = World()   # The world to run in

    def runGame(self, mouse_brain):
        # Start a new game.  We have a cat and a mouse
        # at their starting position
        self.world.resetWorld(np.random.randint(0,self.world.map_width),np.random.randint(0,self.world.map_height),
                              np.random.randint(0,self.world.map_width),np.random.randint(0,self.world.map_height))

        mouse_brain.setupTraining()

        for time_tick in range(self.game_length):
            mouse_movement = mouse_brain.feedInputForGetOutput([(self.world.cat_x)/float(self.world.map_width-1),
                                                                (self.world.cat_y)/float(self.world.map_width-1),
                                                                (self.world.mouse_x)/float(self.world.map_height-1),
                                                                (self.world.mouse_y)/float(self.world.map_height-1)])[0]

            ideal_direction = self.stupidTeacherForMouseGetIdealDirection()
            mouse_brain.teachError([ideal_direction - mouse_movement])

            # This is the direction the mouse brain says it wants to move in.  We treat it as a clockwise compass reading
            # Move the mouse accordingly
            #self.world.moveMouse(time_tick, ideal_direction)
            self.world.moveMouse(time_tick, mouse_movement)

        # Game is completed.  Learn from what we've been taught.
        mouse_brain.learnFromGame()

    def stupidTeacherForMouseGetIdealDirection(self):
        # Play the role of a stupid teacher for the mouse, and direct the mouse to just run in the opposite direction from the cat
        ideal_direction = 0
        if self.world.distance_from_cat_x() &gt;= 0:
            # We could move right.  But check if moving up or down makes more sense
            if self.world.distance_from_cat_y() &gt; self.world.distance_from_cat_x() and self.world.mouse_y != self.world.map_height - 1:
                ideal_direction = self.world.Up
            elif -self.world.distance_from_cat_y() &gt; self.world.distance_from_cat_x() and self.world.mouse_y != 0:
                ideal_direction = self.world.Down
            elif self.world.distance_from_cat_y() &gt; 0 and self.world.mouse_x == self.world.map_width - 1:
                ideal_direction = self.world.Up
            elif self.world.distance_from_cat_y() &lt; 0 and self.world.mouse_x == self.world.map_width - 1:
                ideal_direction = self.world.Down
            else:
                ideal_direction = self.world.Right
        else:
            if self.world.distance_from_cat_y() &gt; -self.world.distance_from_cat_x() and self.world.mouse_y != self.world.map_height - 1:
                ideal_direction = self.world.Up # up is the best way!
            elif -self.world.distance_from_cat_y() &gt; -self.world.distance_from_cat_x() and self.world.mouse_y != 0:
                ideal_direction = self.world.Down # down is the best way!
            elif self.world.distance_from_cat_y() &gt;= 0 and self.world.mouse_x == 0:
                ideal_direction = self.world.Up # can't go left, so go up!
            elif self.world.distance_from_cat_y() &lt; 0 and self.world.mouse_x == 0:
                ideal_direction = self.world.Down # can't go left, so go down!
            else:
                ideal_direction = self.world.Left # left is the best way!
        if self.debug:
            print &quot;cat:&quot;, self.world.cat_x, self.world.cat_y, &quot;mouse:&quot;, self.world.mouse_x, self.world.mouse_y, &quot;distance:&quot;, self.world.distance_from_cat_x(), self.world.distance_from_cat_y(), &quot;ideal: &quot;, ideal_direction
        return ideal_direction

game = GameWithStupidComputerTeacher()
mouse_brain = LSTM_Brain()

print_csv = True
print_progress = not print_csv and True

if not print_csv:
    graphics.init(game.world.map_width, game.world.map_height)
finish = False

for j in range(10000001):
    game.debug = (j == 10000000) and not print_csv

    game.runGame(mouse_brain)

    if mouse_brain.total_smoothed_abs_error*4 &lt; 1.2:
        finish = True # An average of making 1 error per game

    # print out progress
    if (print_progress and j % 1000 == 0) or finish:
        mouse_x = [int(x[0][2]*(game.world.map_width-1)) for x in mouse_brain.input_values]
        mouse_y = [int(y[0][3]*(game.world.map_height-1)) for y in mouse_brain.input_values]
        cat_x = [game.world.cat_x] * len(mouse_brain.input_values)
        cat_y = [game.world.cat_y] * len(mouse_brain.input_values)
        print &quot;Game: &quot;, j
        print &quot;cat x:  &quot;, cat_x
        print &quot;cat y:  &quot;, cat_y
        print &quot;mouse x:&quot;, mouse_x, &quot;     Errors:&quot;, '%.1f'%(mouse_brain.total_abs_error*4), &quot;Smoothed Errors:&quot;, '%.1f'%(mouse_brain.total_smoothed_abs_error*4)
        print &quot;mouse y:&quot;, mouse_y
        print
        graphics.updateGraphics(cat_x, cat_y, mouse_x, mouse_y)

    if print_csv and j % 1000 == 0:
        print j, &quot;,&quot;, mouse_brain.total_smoothed_abs_error*4

    if finish:
        break

At the end of this, we have a mouse that learns to run away from a stationary cat.
The teacher is teaching the mouse to:

1. Move away from the cat, in the direction that you are already furthest in.
2. Unless there you come to a wall. In which case move along the wall, away from the cat.

For a toy example, this is relatively challenging since the mouse neural net is being fed the absolute position of the mouse and the cat,
and so needs to learn to take the difference between the positions, judge which is largest, and modify the behaviour if near a wall.

It takes approximately 1 million games, with each game being 10 moves, for the mouse to learn to follow the teachers’ instruction with only 1.4 mistakes per game (averaged over 1000 games). Reducing this to 1 mistake per game took a further 2 million games and took 40 minutes CPU time on my laptop.

Here is an example game: (The GUI was done in pygame btw)

mouse_with_stationary_cat1

Cat & Mouse start randomly. Mouse is taught to run away from the stationary cat.

And here’s an example mistake that it made even after 2 million training games:

mouse_with_stationary_cat_mistake

Example mistake, after 2 million training games.  The mouse takes a step towards the cat.

I played about with different training rate values (alpha in the code) but the learning rate didn’t seem dependent upon it.

I tested increasing the hidden net from 16 to 32, and that made a pretty big difference. To reach an accuracy of 1.2 mistakes per game took:

  • 16×16 hidden layer took 8m40s and 716342 games
  • 32×32 hidden layer took 3m29s and 239721 games
  • 64×64 hidden layer took 3m13s and 216513 games
  • 128×128 hidden layer took 5m45s and 279732 games

Interestingly, if you compare the first 100,000 games the neural net size makes hardly no difference at all.  They all get down to an error of about 2 at about the same rate.  It’s also cool to see that the large 64×64 neural net takes about 30,000 training games to catch up with the small neural networks, since it has a much larger matrix to tame. Yet the 128×128 is much quicker to train. I don’t know why.
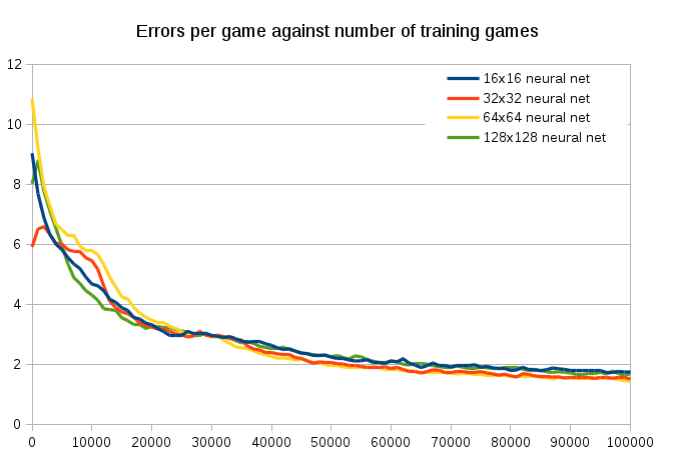
Errors per game

I also wrote a small program to display the synapses_0 matrix, which converts the input to the hidden matrix size, and plotted its against time.  I also attempt to show how it is mapping the four inputs to the output by showing our four colours would be transformed by the matrix.  While it is pretty to watch, it’s hard to see anything useful from it.

output

The synapses_0 matrix values, plotted in grayscale, and how it combines with the inputs.  Each frame is 10,000 training games.

The initial and final state:

Graphics

For the sake of completeness, this is the graphics.py

import pygame

MAP_WIDTH = 10
MAP_HEIGHT = 10

# This sets the margin between each cell
MARGIN = 5
WINDOW_SIZE = [255, 255]

def lightened(color, amount):
  h, s, l, a = color.hsla
  if l+amount &amp;gt; 100: l = 100
  elif l+amount &amp;lt; 0: l = 0
  else: l += amount
  color.hsla = (h, s, l, a)
  return color

def init(map_width, map_height):
    global WINDOW_SIZE, MAP_WIDTH, MAP_HEIGHT, screen, clock, cat_image, mouse_image, grid_width, grid_height
    MAP_WIDTH = map_width
    MAP_HEIGHT = map_height
    grid_width = (WINDOW_SIZE[0] - MARGIN) / MAP_WIDTH - MARGIN
    grid_height = (WINDOW_SIZE[1] - MARGIN) / MAP_HEIGHT - MARGIN

    # Round the window size, so that we don't have fractions
    WINDOW_SIZE = ((grid_width + MARGIN) * MAP_WIDTH + MARGIN, (grid_height + MARGIN) * MAP_HEIGHT + MARGIN)

    # Initialize pygame
    pygame.init()
    # Set the HEIGHT and WIDTH of the screen
    screen = pygame.display.set_mode(WINDOW_SIZE)
    # Set title of screen
    pygame.display.set_caption(&amp;quot;LSTM Neural Net Cat and Mouse&amp;quot;)

    # Used to manage how fast the screen updates
    clock = pygame.time.Clock()
    cat_image = pygame.image.load(&amp;quot;cat.png&amp;quot;)
    mouse_image = pygame.image.load(&amp;quot;mouse.png&amp;quot;)

    mouse_image = pygame.transform.smoothscale(mouse_image, (grid_width, grid_height))
    cat_image = pygame.transform.smoothscale(cat_image, (grid_width, grid_height))

def updateGraphics(cat_x, cat_y, mouse_x, mouse_y):
    for event in pygame.event.get():  # User did something
        if event.type == pygame.QUIT:  # If user clicked close
            done = True  # Flag that we are done so we exit this loop
            pygame.quit()
            return False

    # Set the screen background
    screen.fill(pygame.Color(&amp;quot;black&amp;quot;))

    # Draw the grid
    for row in range(MAP_HEIGHT):
        for column in range(MAP_WIDTH):
            pygame.draw.rect(screen,
                             pygame.Color(&amp;quot;white&amp;quot;),
                             [(MARGIN + grid_width) * column + MARGIN,
                              (MARGIN + grid_height) * row + MARGIN,
                              grid_width,
                              grid_height])
    for i in range(len(mouse_x)):
        color = pygame.Color(&amp;quot;green&amp;quot;)
        color = lightened(color, -30*i/len(mouse_x))
        pygame.draw.rect(screen,
                             color,
                             [(MARGIN + grid_width) * mouse_x[i] + MARGIN*2,
                              (MARGIN + grid_height) * (MAP_HEIGHT - mouse_y[i] - 1) + MARGIN*2,
                              grid_width - MARGIN*2,
                              grid_height - MARGIN*2])
        if i != len(mouse_x) - 1:
            pygame.draw.lines(screen,
                             color,
                             False,
                             [((MARGIN + grid_width) * mouse_x[i] + (MARGIN + grid_width)/2,
                              (MARGIN + grid_height) * (MAP_HEIGHT - mouse_y[i] - 1) + (MARGIN + grid_height)/2),
                              ((MARGIN + grid_width) * mouse_x[i+1] + (MARGIN + grid_width)/2,
                              (MARGIN + grid_height) * (MAP_HEIGHT - mouse_y[i+1] - 1) + (MARGIN + grid_height)/2)],
                             10)
    for i in range(len(cat_x)):
        color = pygame.Color(&amp;quot;red&amp;quot;)
        color = lightened(color, -30*i/len(cat_x))
        pygame.draw.rect(screen,
                             color,
                             [(MARGIN + grid_width) * cat_x[i] + MARGIN*2,
                              (MARGIN + grid_height) * (MAP_HEIGHT - cat_y[i] - 1) + MARGIN*2,
                              grid_width - MARGIN*2,
                              grid_height - MARGIN*2])
        if i != len(cat_x) - 1:
            pygame.draw.lines(screen,
                             color,
                             False,
                             [((MARGIN + grid_width) * cat_x[i] + (MARGIN + grid_width)/2,
                              (MARGIN + grid_height) * (MAP_HEIGHT - cat_y[i] - 1) + (MARGIN + grid_height)/2),
                              ((MARGIN + grid_width) * cat_x[i+1] + (MARGIN + grid_width)/2,
                              (MARGIN + grid_height) * (MAP_HEIGHT - cat_y[i+1] - 1) + (MARGIN + grid_height)/2)],
                             10)
    screen.blit(mouse_image, ((MARGIN + grid_width) * mouse_x[-1] + MARGIN,
                              (MARGIN + grid_height) * (MAP_HEIGHT - mouse_y[i-1] - 1) + MARGIN))
    screen.blit(cat_image, ((MARGIN + grid_width) * cat_x[-1] + MARGIN,
                              (MARGIN + grid_height) * (MAP_HEIGHT - cat_y[i-1] - 1) + MARGIN))

    # Go ahead and update the screen with what we've drawn.
    pygame.display.flip()

    # Limit to 60 frames per second
    clock.tick(60)
    return True